Recently, hardware manufacturers crossed a dangerous line in PC desktop management. Specifically, users noticed invasive pop-up promotions appearing after plugging in brand-new computer monitors. Surprisingly, Windows Update silently installed background utility apps without asking for user permission first. Consequently, these bundled companion applications immediately began serving aggressive LG monitor McAfee pop-up promotions.
However, tech-savvy users can easily block OEM monitor adware before it cluttering their systems. In this guide, I will walk you through the entire removal and prevention process step by step. Therefore, you will regain total control over your operating system and stop unwanted background installations permanently.
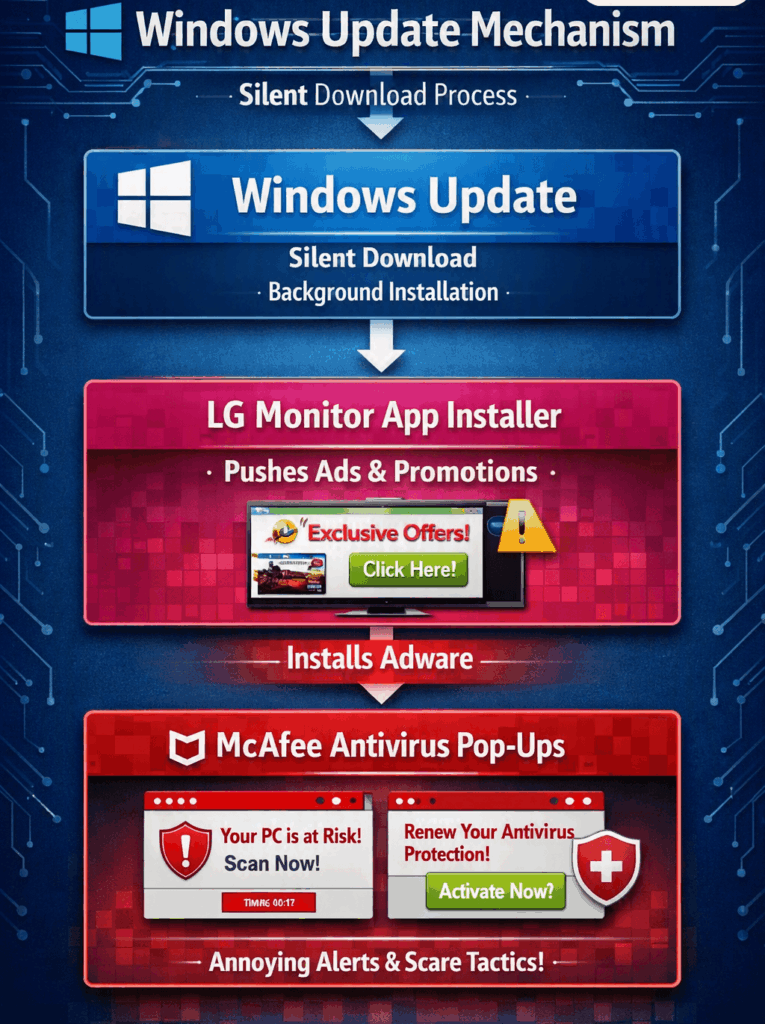
⚠️ Warning: Hardware drivers should only provide essential hardware functionality. Therefore, never allow peripheral companion tools to run unchecked with administrator privileges on your primary machine.
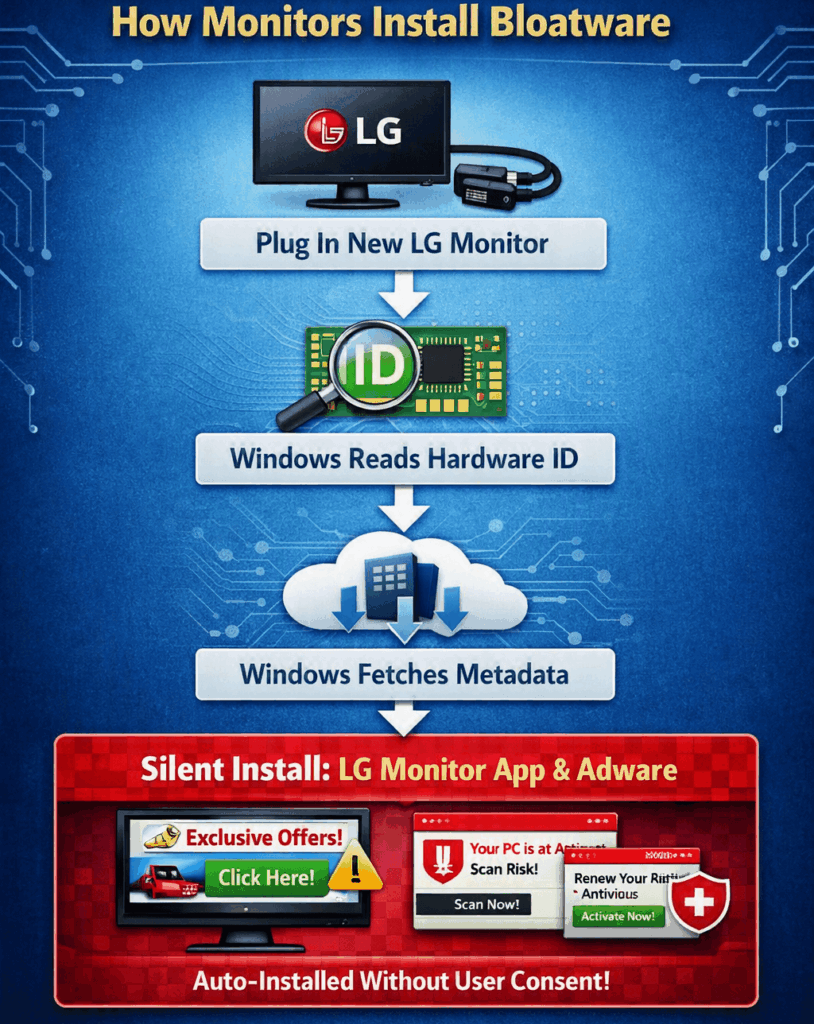
Understanding the Loophole: How Monitors Install Bloatware
For years, users trusted monitor connections as simple display outputs. Nevertheless, modern DisplayPort and HDMI cables carry complex data packets between devices. Furthermore, Microsoft created a feature called Device Metadata to assist hardware deployment. As a result, Windows automatically identifies connected hardware IDs whenever you plug in a new peripheral.
Consequently, the operating system contacts official servers to fetch designated device drivers. However, manufacturers quickly realized they could attach full desktop software to these driver packages. Tech outlets like PCMag Coverage on Windows 11 Device Metadata highlighted how this mechanism bypasses standard user prompts. Therefore, your system silently downloads software installers directly through native background channels.
Additionally, investigative reports from Gamers Nexus Hardware Investigations revealed alarming persistence metrics on tested test benches. Specifically, the LG Monitor App Installer triggered promotional prompts during almost every system reboot cycle. Meanwhile, these background services consumed valuable RAM and CPU cycles continuously. Ultimately, this practice breaks the traditional trust between peripheral vendors and computer owners.
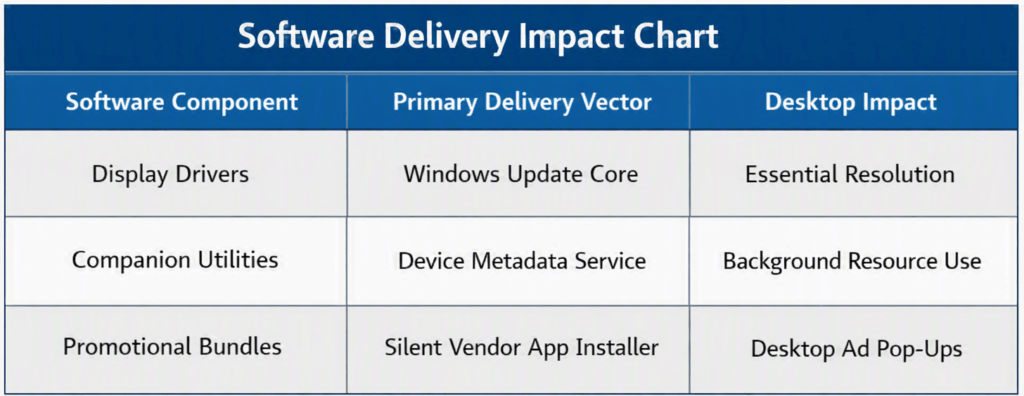
Furthermore, journalism platforms like Windows Latest Tech Report tracked how public outrage eventually forced executive responses. Although executive leadership promised policy changes, the underlying delivery mechanism remains active inside Windows. Therefore, you must proactively stop Windows Update bloatware using built-in system policies. Fortunately, implementing these safeguards requires only a few minutes of configuration time.
How to Uninstall the LG Monitor App Installer
First, you must completely remove any existing adware components already residing on your system storage drive. Fortunately, the main companion application lists itself within standard Windows administrative management menus. However, simply deleting desktop shortcuts will not terminate active background processes or scheduled tasks.
           ┌──────────────────────────────┐
           │  Open Settings (Win + I)     │
           └──────────────┬───────────────┘
                          │
                          ▼
           ┌──────────────────────────────┐
           │ Navigate to Installed Apps   │
           └──────────────┬───────────────┘
                          │
                          ▼
           ┌──────────────────────────────┐
           │ Search "LG Monitor App"      │
           └──────────────┬───────────────┘
                          │
                          ▼
           ┌──────────────────────────────┐
           │ Click Options (...) -> Remove│
           └──────────────────────────────┘
Step 1: Remove the Utility via Windows Settings
- Press
Win + Ion your physical keyboard to launch the main Settings panel immediately. - Next, select the Apps category located on the left navigation sidebar menu.
- Afterward, click on Installed apps to view your complete software index list.
- Type
LGinto the top search query bar to isolate companion programs instantly. - Locate the entry titled LG Monitor App Installer within the filtered results.
- Click the three horizontal dots icon beside the software entry immediately.
- Finally, choose Uninstall and confirm all prompt windows to remove the files completely.
┌─────────────────────────────────────────────────────────┐
│ Installed Apps Search: [ LG                          ]  │
├─────────────────────────────────────────────────────────┤
│ LG Monitor App Installer             Version 1.0.4      │
│ LG Electronics Inc.                  [ Uninstall ... ]  │
└─────────────────────────────────────────────────────────┘
💡 Pro-Tip: Always reboot your desktop computer right after finishing any uninstallation sequence. Consequently, Windows can safely release locked background system files and clear temporary installer directories completely.
Step 2: Clean Up Leftover Background Services
Moreover, software installers often leave behind lingering registration keys and background scheduling tasks. Therefore, you should verify that no secondary services remain active on your machine. You can inspect official system guidelines via Microsoft Support Documentation to understand background services thoroughly.
- Open the Start Menu, type
Task Manager, and launch the system monitoring application. - Switch directly to the Startup apps tab using the left-hand navigation interface.
- Review all entries carefully for remaining mentions of LG or McAfee applications.
- Right-click any suspicious entry and select Disable to prevent future startup attempts.
- Next, open the Start Menu again, type
services.msc, and press Enter. - Scroll through the service list to confirm no secondary installer services are running active.
Additionally, check your Task Scheduler library for rogue update tasks created by hardware setup packages. Specifically, look inside the main library folder for tasks containing manufacturer naming schemes. If you locate any matching items, right-click them and select delete immediately.
How to Prevent Automatic Device Metadata Downloads
Once you clean your existing system files, you must block future silent software installation attempts completely. Otherwise, Windows Update will simply redownload the companion packages the moment you reconnect your display. Fortunately, Microsoft includes administrative controls designed specifically to prevent automatic device metadata downloads.
           ┌──────────────────────────────┐
           │ Launch Group Policy Editor   │
           └──────────────┬───────────────┘
                          │
                          ▼
           ┌──────────────────────────────┐
           │ Navigate to Device Installs  │
           └──────────────┬───────────────┘
                          │
                          ▼
           ┌──────────────────────────────┐
           │  Enable Prevention Policy    │
           └──────────────┬───────────────┘
                          │
                          ▼
           ┌──────────────────────────────┐
           │ Block Automatic Downloads    │
           └──────────────────────────────┘
Method A: Use Group Policy Editor (Windows Pro & Enterprise)
If you run Windows 11 Pro, Enterprise, or Education editions, use the Local Group Policy Editor. This tool offers the cleanest method to disable unwanted driver apps across the operating system. You can review complete enterprise administrative options at Microsoft Group Policy Reference Guide.
1. Open Group Policy Editor:Requires administrative access.
Press Win + R to launch the Run dialog window instantly. Next, type gpedit.msc into the text field and click OK to load policy settings.
2. Navigate to Device Installation Settings:Locate administrative templates.
Expand Computer Configuration on the left menu pane. Then, navigate down through Administrative Templates, select System, and click on Device Installation.
3. Enable the Metadata Prevention Policy:Blocks silent app pulls.
Locate the setting named Prevent automatic download of applications associated with device metadata. Double-click this policy entry to open its configuration properties dialog box.
4. Apply Policy Changes:Enforces lockdown immediately.
Change the policy radio toggle button from Not Configured directly to Enabled. Finally, click Apply, press OK, and restart your computer to enforce the security restriction.
Method B: Change System Properties (Windows Home Edition)
However, Windows Home edition does not include access to the Local Group Policy Editor snap-in utility. Fortunately, you can achieve similar protective results by modifying system hardware properties manually instead.
           ┌──────────────────────────────┐
           │ Run SystemPropertiesAdvanced │
           └──────────────┬───────────────┘
                          │
                          ▼
           ┌──────────────────────────────┐
           │ Select Hardware Tab          │
           └──────────────┬───────────────┘
                          │
                          ▼
           ┌──────────────────────────────┐
           │ Device Installation Settings │
           └──────────────┬───────────────┘
                          │
                          ▼
           ┌──────────────────────────────┐
           │ Toggle Option to "No"        │
           └──────────────────────────────┘
- Press
Win + Ron your keyboard to open the Run executable prompt dialog box. - Type
SystemPropertiesAdvancedinto the input box and press Enter immediately. - Switch directly to the Hardware tab located along the top of the interface window.
- Click the button labeled Device Installation Settings situated near the middle section.
- Select the radio option marked No (your device might not work as expected).
- Save your modified settings by clicking Save Changes at the bottom right corner.
┌─────────────────────────────────────────────────────────┐
│ Device Installation Settings                            │
├─────────────────────────────────────────────────────────┤
│ Do you want to automatically download manufacturers'    │
│ apps and custom icons available for your devices?       │
│                                                         │
│ ( ) Yes (recommended)                                   │
│ (•) No (your device might not work as expected)         │
│                                                         │
│                     [ Save Changes ]   [ Cancel ]       │
└─────────────────────────────────────────────────────────┘
⚠️ Warning: Changing device installation settings stops Windows from fetching custom manufacturer icons and software utilities automatically. However, standard graphics card drivers and basic display functions will continue operating completely normally.
Best Practices to Keep Windows 11 Clean and Fast
Taking back control of your desktop environment requires consistent maintenance habits over time. Although Microsoft resolved this specific issue after public pushback, peripheral makers continuously test new marketing channels. Therefore, following proactive security steps ensures your desktop remains responsive, secure, and bloatware-free.
┌─────────────────────────────────────────────────────────┐
│            PC Maintenance Checklist                     │
├─────────────────────────────────────────────────────────┤
│ [✓] Audit Installed Apps Monthly                        │
│ [✓] Disable Unnecessary Startup Programs                │
│ [✓] Block Metadata Software Downloads                   │
│ [✓] Use Windows Defender for Security                   │
└─────────────────────────────────────────────────────────┘
- Audit Installed Programs Regularly: Review your software index monthly to spot surprise background utilities.
- Avoid Unnecessary Companion Software: Display monitors do not require desktop software to display crisp video signals.
- Monitor Background Resource Consumption: Use Task Manager to catch rogue tasks before they impact gaming performance.
- Maintain Updated OS Security: Keep core Windows security patches active while blocking optional OEM promotional bundles.
Ultimately, keeping your computer free from unwanted software requires ongoing vigilance. By blocking metadata downloads, you eliminate an entire category of invasive desktop promotions effectively. Furthermore, your PC will benefit from faster boot times and reduced memory usage overall.
Final Thoughts & Conclusion
Plugging in hardware peripherals should never expose your personal computer to invasive desktop advertisements. Unfortunately, OEM vendors abused Windows Update distribution pipelines to push unwanted trial software directly to consumers. Fortunately, using the steps outlined above allows you to remove Windows 11 adware completely. Moreover, locking down device metadata policies prevents future intrusion attempts across all hardware brands.
Now, I want to hear from you! Have you encountered silent bloatware installs after connecting new monitors or gaming peripherals on your PC? Drop a comment below with your experience, share this guide with fellow PC builders, and let me know which tech topics you want covered next on TechnicalForum.org!