Microsoft recently rolled out cumulative updates for Windows 11 systems worldwide. Shortly after, PC gamers began reporting severe AMD Radeon Graphics Driver Crashes. You might launch your favorite game and encounter an instant desktop crash. Alternatively, your monitor screen might freeze completely during heavy system workloads.
These stability issues usually stem directly from the Windows 11 KB5124008 update fix process gone wrong. Windows Update often overwrites official AMD display drivers with generic, outdated Microsoft drivers. Consequently, this driver conflict triggers immediate system crashes, severe frame drops, and frustrating display stuttering.
In this detailed technical guide, we will examine why this conflict occurs on your system. Furthermore, we will walk you through proven step-by-step solutions to fully restore your PC performance.
Understanding the Windows 11 KB5124008 Conflict
Microsoft designed the KB5124008 cumulative package to enhance underlying system security and core performance. However, the update mechanism frequently forces outdated graphics drivers onto your system without explicit permission. Consequently, this aggressive driver replacement triggers severe AMD Radeon Software timeout error pop-ups during regular daily usage.
Your operating system requires precise alignment between installed display drivers and active Control Center software packages. Unfortunately, Windows Update replaces the core driver files while leaving the AMD software suite intact. Therefore, the AMD software suite fails to communicate with the newly installed Microsoft driver version.
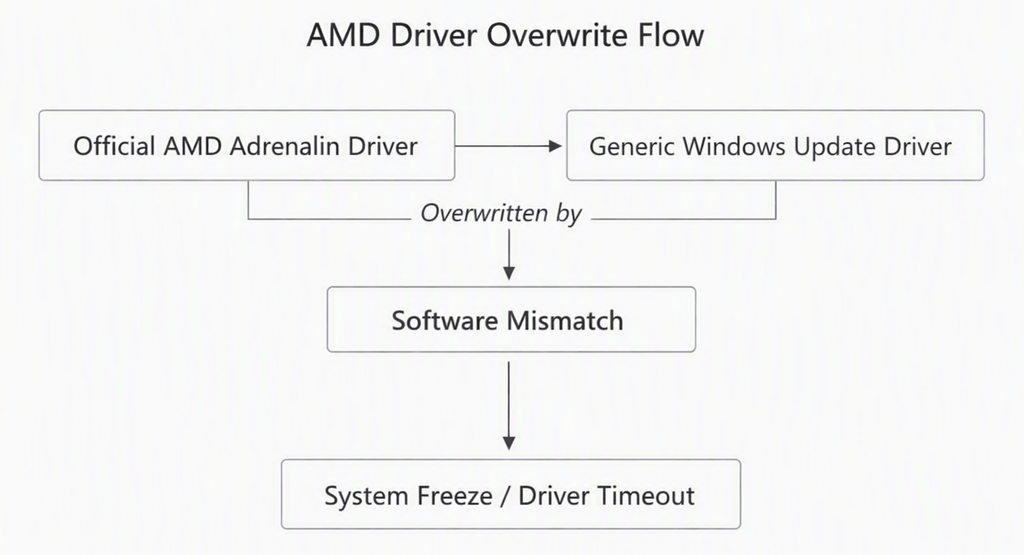
This mismatch directly causes your graphics card to crash under light or heavy loads. Moreover, your display monitor might flicker continuously or default to a basic resolution setting. System resource monitoring tools often show unusual GPU utilization spikes immediately before system failures.
Furthermore, multi-monitor setups suffer immensely from these unexpected background driver modifications by Windows Update. Secondary monitors often go completely dark because generic display drivers lack proper multi-display routing protocols. Understanding this underlying mechanics helps us apply long-term preventative measures to our system environment.
⚠️ Warning: Ignoring these continuous display crashes can lead to unexpected corrupt file saves, lost project work, and potential operating system system integrity issues.
Method 1: Prevent Windows Update from Replacing Graphics Drivers
You must first prevent Windows 11 from automatically replacing display drivers on your hardware. Otherwise, Windows Update will simply re-install the problematic generic driver every single week automatically.
Using Group Policy Editor (Windows 11 Pro and Enterprise)
The Group Policy Editor offers the most reliable method for controlling device installation behavior. Windows Pro users can easily toggle system policies to lock down GPU driver modifications completely.
- Press the Windows Key + R shortcut on your keyboard to open the Run dialog box.
- Type
gpedit.mscinto the text box and hit Enter immediately to open the window. - Navigate directly through the administrative path on the left navigation panel:
- Computer Configuration > Administrative Templates > Windows Components > Windows Update > Manage updates offered from Windows Update
- Locate and double-click the policy setting labeled Do not include drivers with Windows Updates.
- Select the Enabled option button near the top left of the configuration window.
- Click Apply, then select OK to save your updated policy configuration settings permanently.
Using System Properties (Windows 11 Home)
Windows Home edition users lack access to the local Group Policy Editor administrative tool. However, you can achieve similar driver protection results directly through advanced Windows system properties.
- Open your Windows Search bar and type Control Panel, then hit Enter.
- Click on the System icon, then select Advanced system settings on the left menu side.
- Switch over to the Hardware tab inside the small System Properties window.
- Click the Device Installation Settings button located right in the center panel.
- Select the option that says No (your device might not work as expected) clearly.
- Save your settings changes, then reboot your system completely to finalize driver protection policies.
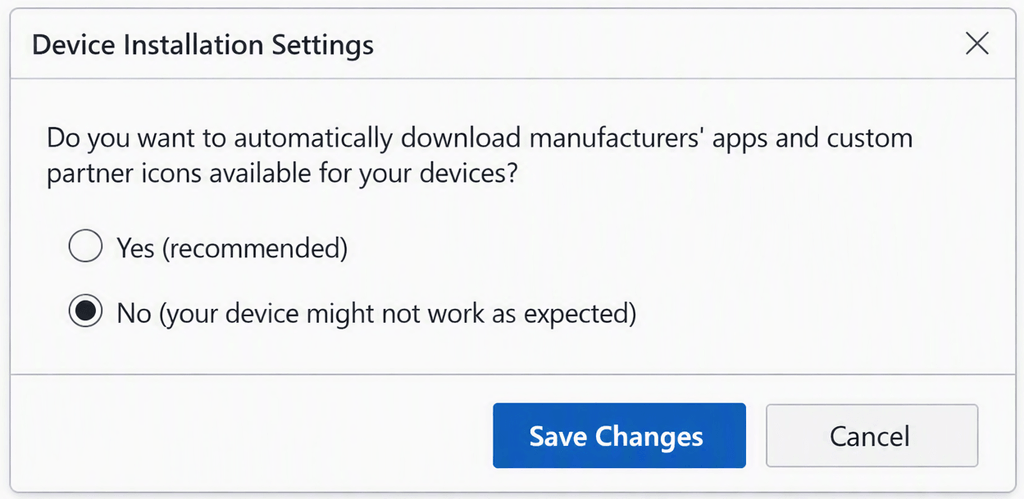
By taking control over stop Windows updating graphics drivers behaviors, you permanently protect custom AMD software installations. Consequently, future Windows updates will leave your display drivers completely untouched and fully functional.
Method 2: Perform a Clean Driver Reinstallation via DDU
Once you secure your update settings, you must remove all corrupted display driver files entirely. Simply installing new drivers over broken ones rarely solves deeply embedded driver registry issues. Therefore, following a proper Display Driver Uninstaller guide ensures a completely clean system slate for installation.
Step 1: Download Essential Utility Packages
First, download the latest version of Display Driver Uninstaller (DDU) directly from Wagnardsoft. Next, visit the official AMD Driver and Support portal on your web browser. Locate and download the correct installer package for your specific Radeon graphics card model manually.
Step 2: Boot Windows 11 Into Safe Mode
Running cleanup utilities in standard Windows mode often leaves locked driver files completely untouched. Therefore, you must boot your desktop or laptop into Windows Safe Mode for best results.
- Hold down your physical Shift key while clicking Restart inside the Windows Start Menu.
- Select Troubleshoot once the blue advanced startup recovery menu appears on your screen.
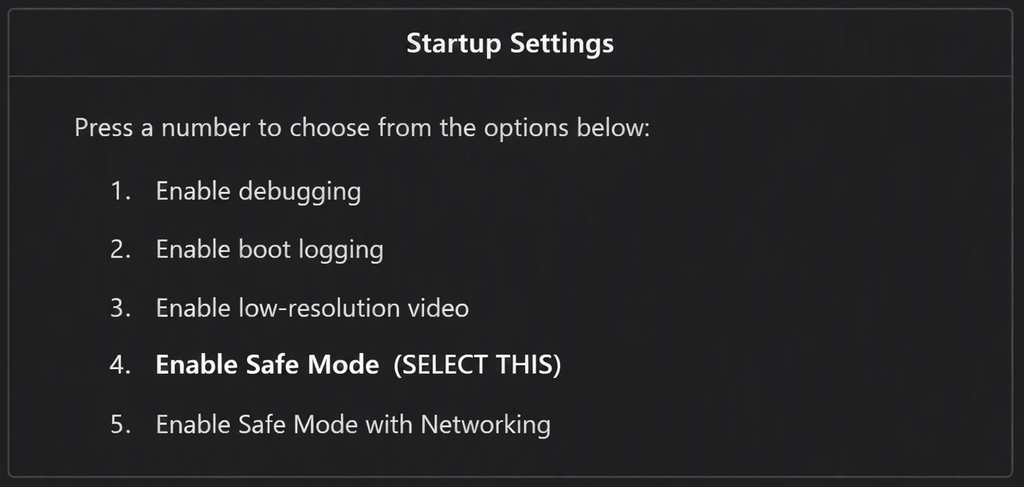
- Navigate directly to Advanced Options and choose Startup Settings from the selection grid.
- Click the Restart button located at the bottom right corner of the screen.
- Press the 4 key or F4 key to launch Windows 11 into Safe Mode properly.
Step 3: Run Display Driver Uninstaller
Once your system boots into Safe Mode, extract your downloaded DDU zip file to your desktop. Launch the executable file, then select GPU under the device type dropdown menu choices. Ensure the software selects AMD automatically as your targeted graphics device driver brand.
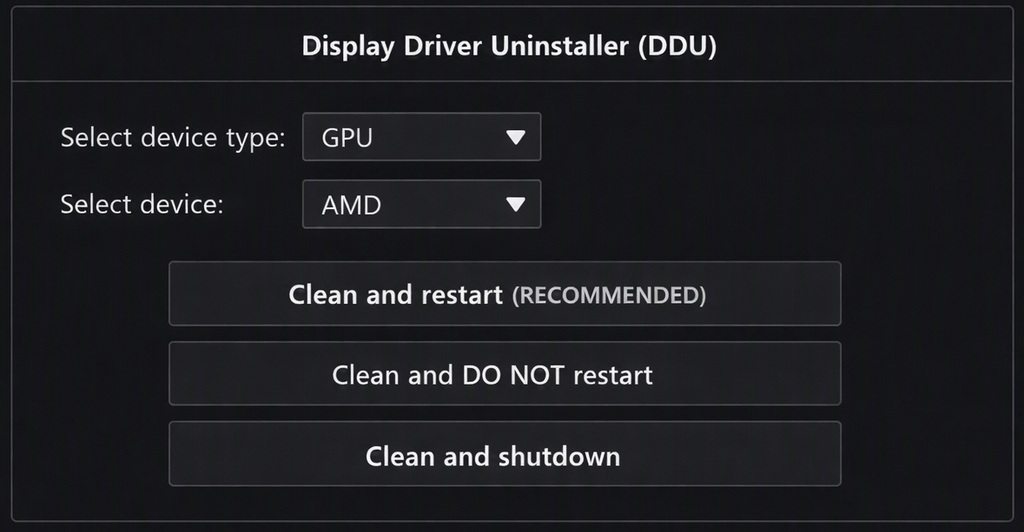
Click the Clean and restart button to begin the automated cleanup utility sequence. The software will purge every old driver file, registry entry, and cached display setting thoroughly. Afterward, your computer system will reboot automatically back into normal Windows operating mode.
💡 Pro-Tip: Disconnect your Ethernet cable or turn off Wi-Fi before running DDU cleanup routines. This step prevents Windows from attempting to auto-download generic display drivers while offline.
Step 4: Install Official AMD Adrenalin Software
After your PC reboots into normal mode, locate your previously downloaded official AMD driver package. Right-click the installation file and choose Run as administrator to begin setup procedures. Select the Full Install option to ensure you receive the complete Adrenalin user interface.
Complete the installation wizard process, then reboot your computer system one final time properly. You have now eliminated all lingering files left behind by Windows Update replacing AMD drivers.
Method 3: Roll Back or Uninstall Windows 11 KB5124008
If driver crashes persist after clean reinstallation, the cumulative update package itself contains core bugs. Therefore, you should temporarily roll back Windows 11 update files until Microsoft addresses the underlying issues.
Uninstalling the Update via Settings
- Open your Windows System Settings using the Windows Key + I keyboard shortcut.
- Click on the Windows Update tab located at the bottom of the left menu bar.
- Scroll down the panel and select the Update history menu option.
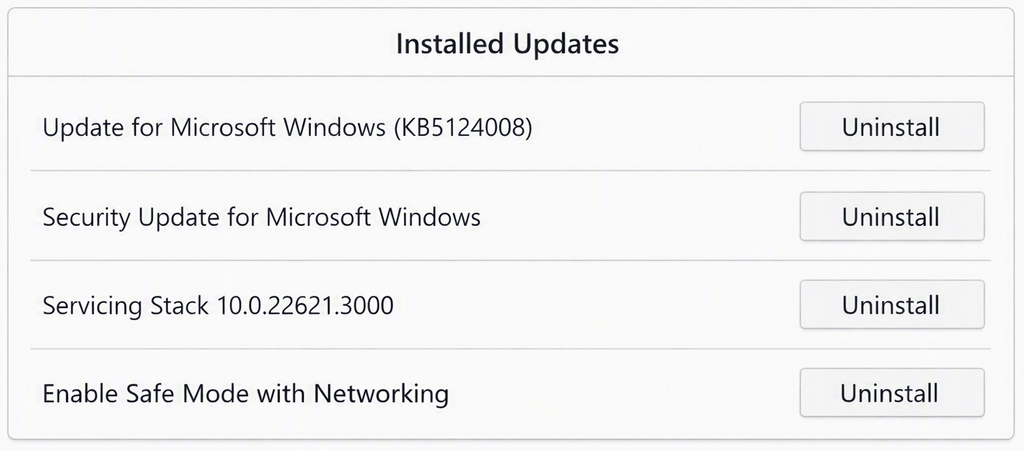
- Scroll down to the Related settings area and click Uninstall updates.
- Locate the entry labeled Update for Microsoft Windows (KB5124008) inside the system list.
- Click the Uninstall button next to the entry, then confirm your selection when prompted.
Uninstalling via Command Prompt
Alternatively, you can remove stubborn update packages quickly using the Windows Command Prompt utility.
- Open the Windows Search bar and type
cmdinto the search box carefully. - Right-click Command Prompt and select Run as administrator from the context menu.
- Type
wusa /uninstall /kb:5124008 /quiet /norestartdirectly into your command terminal screen. - Press Enter to execute the background uninstallation process on your system immediately.
- Reboot your desktop computer manually once the terminal finishes processing your typed command line.
After removing the update, check the official Microsoft Support Windows Release Health page for status updates. Microsoft usually documents known software conflicts and releases quick hotfix patches for affecting cumulative updates.
Method 4: Adjust Windows Registry for Driver Timeout Detection
Windows uses a feature called Timeout Detection and Recovery (TDR) to monitor graphics card responsiveness. If your GPU takes too long to respond, Windows resets the driver automatically, causing crashes. Modifying TDR values gives your AMD card more time to process heavy graphics workloads smoothly.
- Press Windows Key + R, type
regeditinto the box, and press Enter. - Navigate directly to the following registry path inside the registry editor window:
HKEY_LOCAL_MACHINE\SYSTEM\CurrentControlSet\Control\GraphicsDrivers - Right-click on empty space in the right panel and select New > DWORD (32-bit) Value.
- Name this new entry TdrDelay using exact capitalization rules carefully.
- Double-click TdrDelay, change the base value to Decimal, and set value data to 8.
- Create another DWORD entry named TdrDdiDelay, select Decimal, and set its value to 8.
- Close the Registry Editor window and restart your desktop computer to apply these system changes.
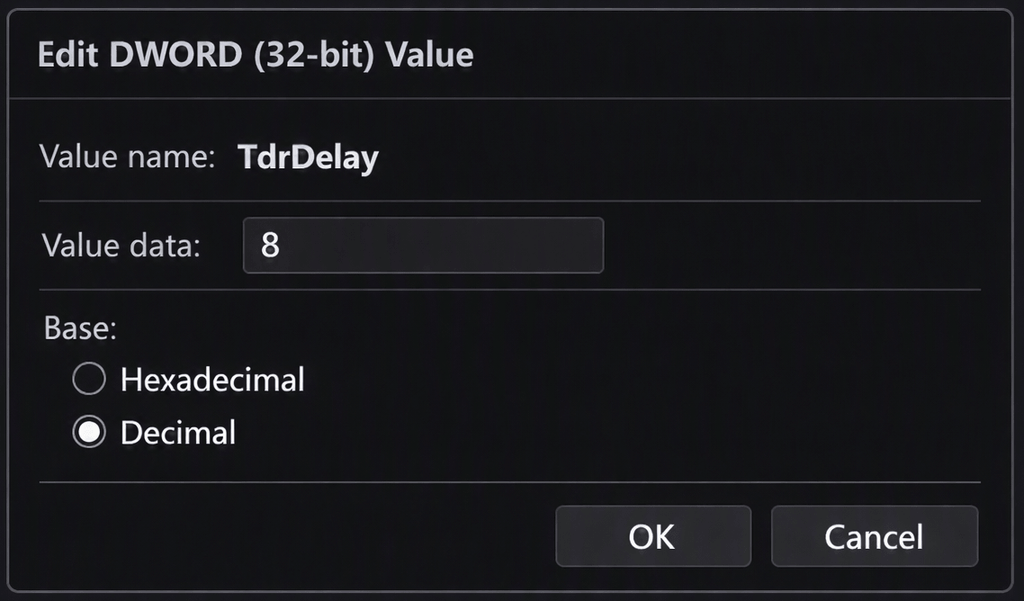
Increasing TDR delay parameters prevents premature driver resets during sudden graphics processing spikes. Furthermore, this simple modification completely resolves minor timeout errors without sacrificing overall operating system stability.
Method 5: Disable Windows Fast Startup Feature
The Fast Startup feature saves active system kernel states to disk for faster system boot times. However, this saved state often retains corrupted driver sessions across system reboots, perpetuating driver instability.
- Open the Control Panel app using your standard Windows Search bar menu.
- Change your view setting at the top right from Category to Large icons.
- Select Power Options from the available system utility shortcuts list choices.
- Click Choose what the power buttons do on the left panel menu.
- Click the link that says Change settings that are currently unavailable near the top.
- Uncheck the box labeled Turn on fast startup (recommended) under Shutdown settings settings.
- Click the Save changes button at the bottom and restart your computer system.
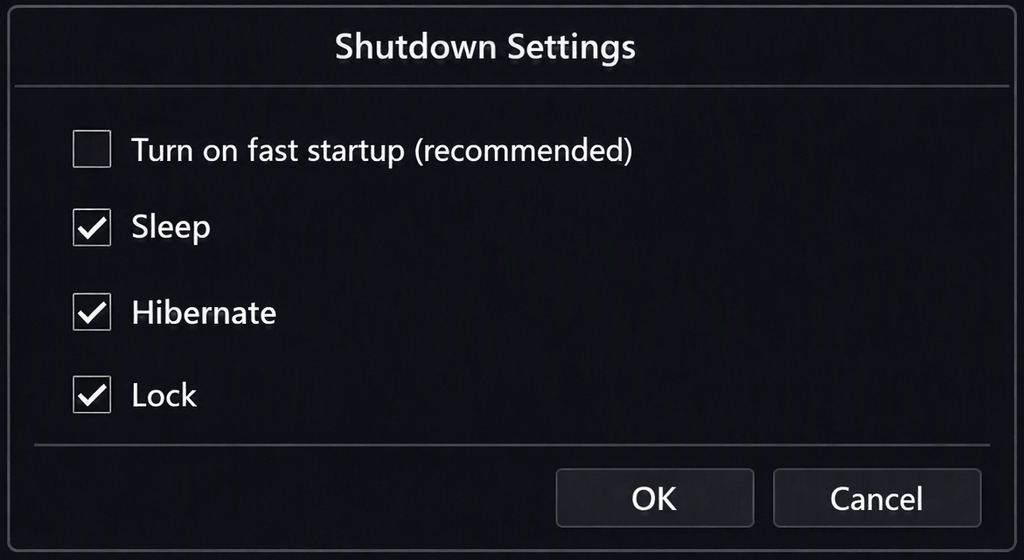
Disabling Fast Startup forces Windows 11 to re-initialize your AMD hardware display drivers completely fresh upon startup. Consequently, lingering memory corruption errors disappear entirely from your daily gaming sessions and rendering workflows.
Additional Hardware and System Checks
Sometimes software updates simply expose existing underlying hardware issues inside your desktop PC case. Therefore, completing basic hardware troubleshooting steps helps isolate software conflicts from physical hardware degradation entirely.
Check Power Delivery and Cable Connections
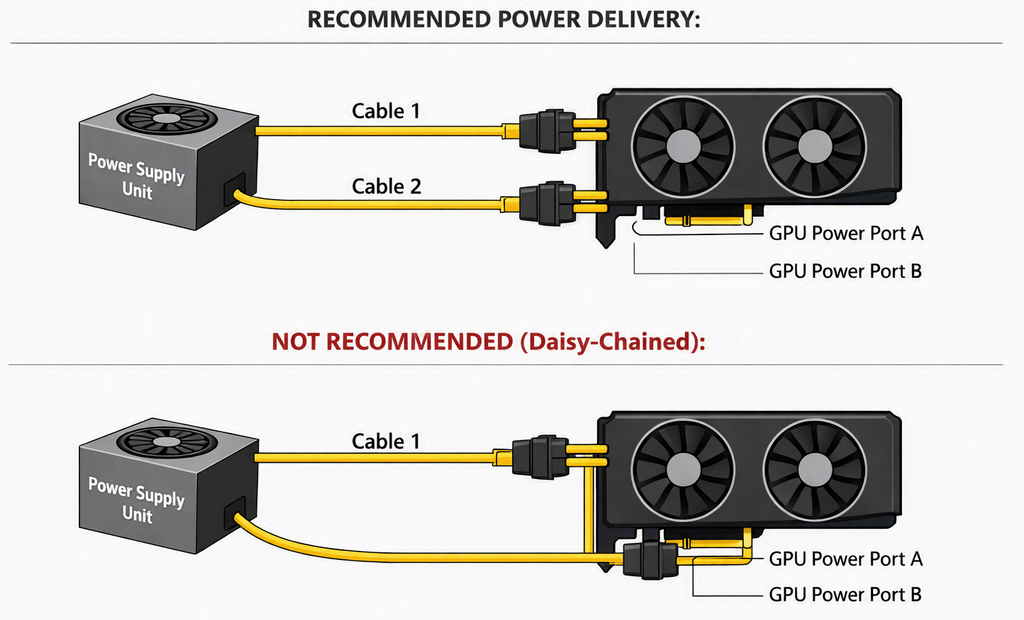
Modern AMD Radeon graphics cards require clean, steady power delivery from your system power supply unit. Inspect your PC interior and ensure separate PCIe power cables feed your graphics card directly. Avoid using single daisy-chained power splitter cables for demanding, high-wattage graphics card models.
Furthermore, reseat your graphics card firmly inside its PCIe expansion slot on your motherboard. Dust buildup inside PCIe slots frequently causes signal degradation, triggering unexpected driver crashes under load. You can consult reputable technical sites like Tom’s Hardware for detailed hardware maintenance guides.
Verify System RAM and VRAM Stability
Unstable system memory profiles frequently mimic graphics driver crashes during high-resolution gaming sessions. Disable custom memory overclocks or Expo/XMP profiles temporarily inside your system motherboard BIOS settings screen. Run the built-in Windows Memory Diagnostic tool to scan your RAM modules for physical memory errors.
Additionally, monitor your graphics card temperatures using official AMD Software: Adrenalin Edition metrics overlays. Excessive GPU core or VRAM junction temperatures inevitably cause driver safeguards to trigger emergency system shutdowns. Clean dusty heatsink cooling fins and verify all GPU cooling fans spin correctly during operation.
| Troubleshooting Checklist | Target Component | Recommended Action |
| PCIe Power Cabling | Power Supply Unit | Use independent 8-pin cables; avoid daisy chains. |
| Physical Slot Contact | Motherboard PCIe Slot | Reseat GPU firmly and clean dust build-up. |
| System Memory | DDR4 / DDR5 RAM | Disable XMP/EXPO profiles temporarily to test stability. |
| Thermal Performance | GPU Heatsink / Fans | Keep VRAM junction temperatures below 95°C under load. |
Final Thoughts
Dealing with AMD Radeon Graphics Driver Crashes after major Windows updates proves incredibly frustrating for PC users. However, taking back control of your device installation settings permanently prevents Microsoft from breaking working drivers. By using DDU in Safe Mode, rolling back problematic updates, and tweaking TDR registry settings, you can easily restore total system stability.
Keep your system drivers updated manually through official manufacturer software instead of relying on Windows Update. This proactive approach saves time and keeps your gaming rig running smoothly without unexpected performance interruptions.
Have you successfully resolved your AMD driver crash issues using our step-by-step troubleshooting guide today? Share your thoughts, questions, or additional fixes in the comments below to help fellow tech enthusiasts!