
A Windows 11 update can stall during download, fail during installation, or roll back after a restart. The point where it fails helps you choose the right fix. A damaged update cache can interrupt downloads. Low disk space, driver conflicts, and corruption in the Windows component store can prevent a downloaded update from installing.
Before changing anything, open Settings → Windows Update → Update history. Record the failed update’s KB number, the exact error code, and when the failure occurred. Press Win + R, enter winver, and note your Windows version and OS build. These details help you match your problem to a Microsoft advisory and verify the repair later.
💡 Pro-Tip: Before clearing update files or repairing Windows, match your version, KB number, and symptoms against Microsoft’s Windows Release Health dashboard. Check both Known issues and Resolved issues for your release.
During the November 2026 security update rollout, Microsoft documented repeated installation failures with 0x80070306, 0x800f0989, and 0x800f0993. Microsoft expected its automatic repair to reach affected online PCs within 24–48 hours. If your symptoms match, keep the PC online and follow the November 2026 update advisory for KB5132061.
The steps below assume Windows can reach the desktop. If an update repeatedly rolls back and Windows never reaches the sign-in screen, go to the recovery steps in Section 4.
1. Run the quick preliminary checks
Check storage, peripherals, and the system clock
Start with the checks you can complete without changing Windows services. If Windows Update shows Restart required, save your work and restart normally before retrying the update. If a download is stuck, confirm that the PC can reach the internet and that its connection stays active. For related symptoms, see Microsoft’s guide to troubleshooting Windows Update.
- Aim for at least 20 GB free on
C:. Press Win + E and open This PC to check the space available on the Windows drive. To reclaim space, go to Settings → System → Storage → Temporary files. Review the selected categories, especially Downloads if it appears, before choosing Remove files. Treat 20 GB as a practical troubleshooting target. The actual space required varies by update. - Disconnect nonessential USB devices and docks. Safely eject external drives, then disconnect unused printers, card readers, and other accessories. If your dock supplies power or Ethernet, connect your charger directly and establish another network connection first. If you are supporting the PC remotely, preserve the connection you need to regain access.
- Sync the date and time. Open Settings → Time & language → Date & time. Turn on Set time automatically, verify the time zone, and select Sync now under Additional settings. Confirm that Windows shows the correct local date and time.
Run the Windows Update troubleshooter
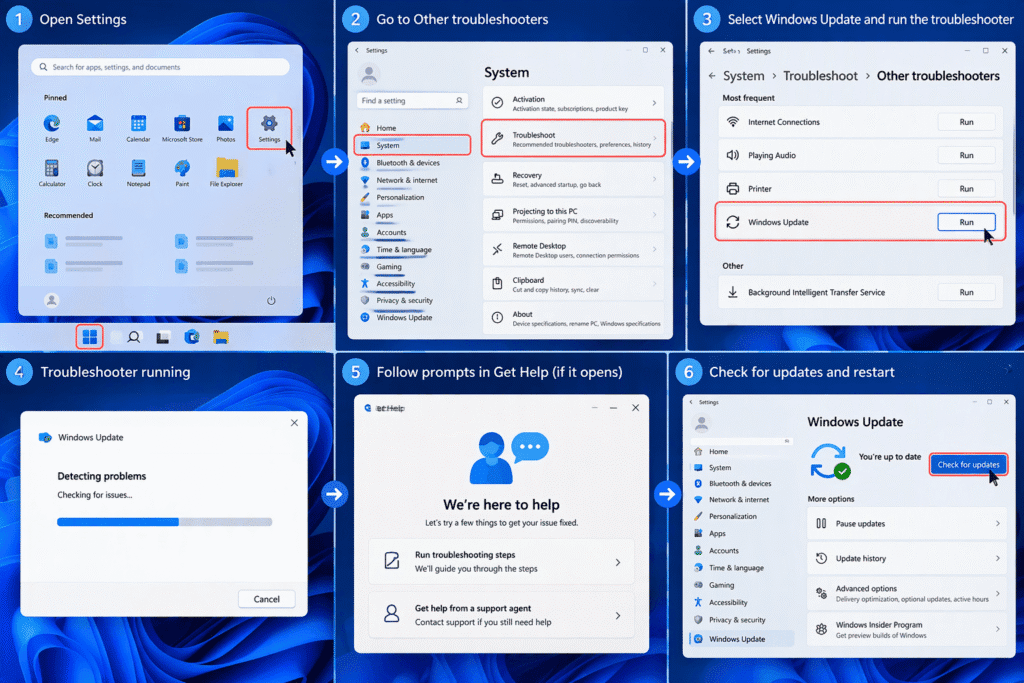
Open Settings → System → Troubleshoot → Other troubleshooters. Find Windows Update, select Run, and follow the prompts in Get Help if it opens. Restart once the troubleshooter finishes. Return to Settings → Windows Update and select Check for updates.
If the update still stalls during download or fails again before restart, try rebuilding the update cache. If Windows shows a new error, record it alongside the original code. A different code can help you tell whether the failure moved from downloading the package to installing it.
2. Reset the Windows Update cache
Windows stores downloaded update files and its local update history database in SoftwareDistribution. The catroot2 folder holds catalog data Windows uses to verify updates. Renaming both folders lets Windows recreate them and download a fresh copy of the update.
⚠️ Warning: Never force-shut down or unplug your PC while Windows displays “Working on updates” or “Undoing changes made to your computer.” Keep it connected to power and let the process finish. Resetting SoftwareDistribution can clear prior entries from the local Update history view. Record the failed KB number and error code first. Installed updates remain intact.
Stop the services and rename the cache folders
Back up important files and wait for any active Windows update or software installation to finish. Close Settings before proceeding. If a work or school organization manages the PC, coordinate the reset with IT.
Search for Command Prompt, select Run as administrator, and approve the prompt. Run the following commands one at a time. They stop Windows Update, Cryptographic Services, Background Intelligent Transfer Service (BITS), and Windows Installer. A message that a service was already stopped is fine.
net stop wuauserv
net stop cryptSvc
net stop bits
net stop msiserver
In the same window, rename the two folders. If either .bak name already exists, use an unused suffix such as .bak2 for that folder. Leave the similarly named catroot folder alone. If a service fails to stop or a folder remains locked, restart the services you stopped before investigating.
ren "%SystemRoot%\SoftwareDistribution" SoftwareDistribution.bak
ren "%SystemRoot%\System32\catroot2" catroot2.bak
Restart the services and retry the update
net start cryptSvc
net start bits
net start wuauserv
net start msiserver
Restart the PC, then go to Settings → Windows Update → Check for updates. Allow Windows to download the package again. If the download completes but installation still fails, check the component store and protected system files. If only the download stalls, you can try the standalone package in the next section.
3. Repair corrupted system files or install the update manually
Run DISM before SFC
Deployment Image Servicing and Management (DISM) repairs the Windows component store. System File Checker (SFC) uses that store to replace missing or corrupted protected system files. Running DISM first gives SFC a healthy source for those replacements. See Microsoft’s instructions for repairing Windows with DISM and System File Checker.
Open Command Prompt → Run as administrator. Run the following command and wait for DISM to report that the repair completed successfully.
DISM.exe /Online /Cleanup-image /RestorehealthIn the same window, run SFC and let verification reach 100%. If SFC repairs files, restart the PC and retry the update. If DISM reports that it cannot find source files, record the exact error. DISM normally retrieves repair content through Windows Update. If that route fails, use a compatible repair source or proceed to the in-place repair below.
sfc /scannowDownload the standalone .msu package
A standalone package can get you past a stuck download in Settings. You will need the failed update’s KB number and the correct package for your PC. Run winver to confirm your Windows release. Then open Settings → System → About and check System type for x64 or ARM64.
- Search for the exact KB number in the Microsoft Update Catalog.
- Match the result to your Windows release and architecture. Select Download and save the
.msufile. - Check How to get this update in the KB article. Some cumulative updates require earlier checkpoint packages. Follow Microsoft’s listed installation order.
- Double-click the
.msufile and follow the Windows Update Standalone Installer prompts. Restart when prompted. Verify the result in Update history or comparewinverwith the build listed in the KB article.
If the installer says the update is not applicable, recheck the release, architecture, and prerequisites. Also check whether your PC already has a newer cumulative update. If the standalone package fails with the same installation error, record that result before moving to recovery.
4. Perform an in-place upgrade repair
Reinstall Windows from a mounted ISO
An in-place upgrade repair reinstalls Windows while preserving your personal files, installed apps, and settings when you choose the appropriate option. Start Setup from the running Windows desktop. Use a compatible Windows 11 release at least as recent as the one installed, and match your edition, base language, and architecture.
⚠️ Warning: Back up critical data before starting. If you use BitLocker or Device Encryption, make sure you can retrieve your recovery key from another device. On the final Ready to install screen, verify that Keep personal files and apps is selected before clicking Install. If that option is missing or unavailable, cancel Setup and check the installation media.
- Download a compatible ISO from the official Windows 11 download page.
- In File Explorer, right-click the ISO and select Mount. Open the mounted drive and double-click
setup.exe. - Select Change what to keep if necessary, then choose Keep personal files and apps. Confirm the selection on Ready to install before choosing Install.
- Keep the PC connected to power through each restart. Once you return to the desktop, open Settings → Windows Update → Check for updates. Verify the resulting build with
winver.
Recover from an update that prevents Windows from starting
If a cumulative update left the PC in a boot loop, use Windows Recovery Environment when it appears. Select Troubleshoot → Advanced options → Uninstall Updates → Uninstall latest quality update, if available. Windows may ask for the BitLocker recovery key. On a managed PC, contact IT for the key and the approved plan to restore updates.
Common Windows 11 update error codes
| Error code | Primary cause | Recommended fix |
|---|---|---|
0x80070070 | Insufficient free disk space. | Free space on C:, restart, and retry. Follow Setup’s space requirement if it asks for more. |
0x80073712 | Windows component store corruption. | Run DISM, then SFC. Consider an in-place repair if corruption persists. |
0x800f0989 / 0x800f0993 | Microsoft reported both codes during the November 2026 security update installation issue. | Match the KB, Windows release, and symptoms to the advisory. If they match, keep the PC online to receive Microsoft’s repair. |
0x80240034 | Windows Update failed to download the package. | Check connectivity and retry. If the download repeatedly stalls, reset the cache or use the Microsoft Update Catalog. |
0x80070002 | Windows could not find a required file. | Restart and run the troubleshooter. If the error persists, reset the update cache and retry. |
Conclusion
Let the failure stage guide the repair. Use the cache reset or Catalog for repeated download failures. Use DISM and SFC when Windows reports corruption, and reserve an in-place repair for persistent installation failures. After each fix, verify the update in Update history or check the expected build with winver.
If the same KB still fails, record the build, code, failure time, and whether the failure happened before or after restart. For an installation failure or rollback, %SystemRoot%\Logs\CBS\CBS.log can help IT or Microsoft Support identify the servicing step that failed. If a fix worked for you, share the KB number, error code, and successful step in the comments.