A New Era of Visual Comfort
Microsoft recently rolled out an exciting update for desktop users. Specifically, the tech giant introduced the innovative Windows 11 Screen Tint feature in their latest Insider preview builds. This built-in accessibility color overlay applies a digital wash across your entire monitor. Consequently, the setting softens bright displays during long computer work sessions. Many professionals struggle constantly with intense glare from modern monitors. Therefore, this native tool offers an elegant solution to reduce eye strain without third-party software.
Historically, users relied heavily on hardware monitor buttons to lower aggressive brightness. Alternatively, people downloaded third-party utilities like f.lux to modify monitor color profiles. However, those applications can occasionally conflict with Windows display drivers. This new native feature runs directly inside the Windows 11 core operating system framework. Thus, the tool delivers seamless performance across multiple monitors simultaneously. In this ultimate guide, you will learn exactly how to configure this outstanding utility.
Beyond the Traditional Night Light
Many users immediately confuse this new tool with the existing Windows Night Light utility. However, these two features serve completely different visual purposes. Night Light specifically targets blue light reduction to help improve your sleep cycles. It gradually warms the screen to an amber shade as darkness falls. In contrast, the accessibility color overlay changes the overall intensity of the panel throughout the whole day. It does not care about the clock on your taskbar.
Instead, it lets you maintain optimal Windows 11 eye comfort during morning spreadsheet tasks or afternoon writing sessions. You can even run both features together to maximize your visual protection. For example, Night Light can manage color warmth while the screen tint controls harsh contrast. This combination provides complete authority over your workstation’s visual environment. Let us dive deep into the specific operational mechanics of this update.
Understanding the Screen Tint Mechanics
How the Overlay System Operates
The operating system injects a solid, translucent color layer directly over your desktop environment. Because this occurs at the system level, the filter covers every application windows. It blankets your web browser, code editor, and file explorer evenly. Consequently, white background pages no longer pierce your retinas with raw, unfiltered light. This architectural choice ensures uniform color balance across all active software.
Furthermore, the overlay system utilizes your graphics processing unit to maintain excellent desktop frame rates. You will not notice any interface lag or stuttering during daily operation. Microsoft carefully optimized the rendering loop for this feature. Therefore, gamers and video editors can benefit from the tool without sacrificing system performance. It operates silently in the background while you focus on creative productivity tasks.
Color Filters Compatibility Tradeoff
Before activating this tool, you must understand one critical operational rule. Specifically, enabling the screen tint utility automatically turns off your existing screen color filters. Microsoft designed these two systems to be completely mutually exclusive inside the vision menu. If you use deuteranopia or protanopia color-blindness filters, you cannot stack this tint overlay on top. Therefore, you must choose the specific option that best supports your vision.
⚠️ Warning: Activating Windows 11 Screen Tint immediately disables active color blindness profiles. Always save your original accessibility preferences before testing this new display configuration.
If you turn on color filters later, Windows will instantly disable your customized screen tint. This protective guardrail prevents chaotic color overlapping that could ruin visibility. Users should read the official Microsoft Support Page for detailed compatibility charts. Understanding these fundamental design limitations will save you from technical confusion down the road.
Step-by-Step Configuration Guide
Navigating to the Vision Settings Menu
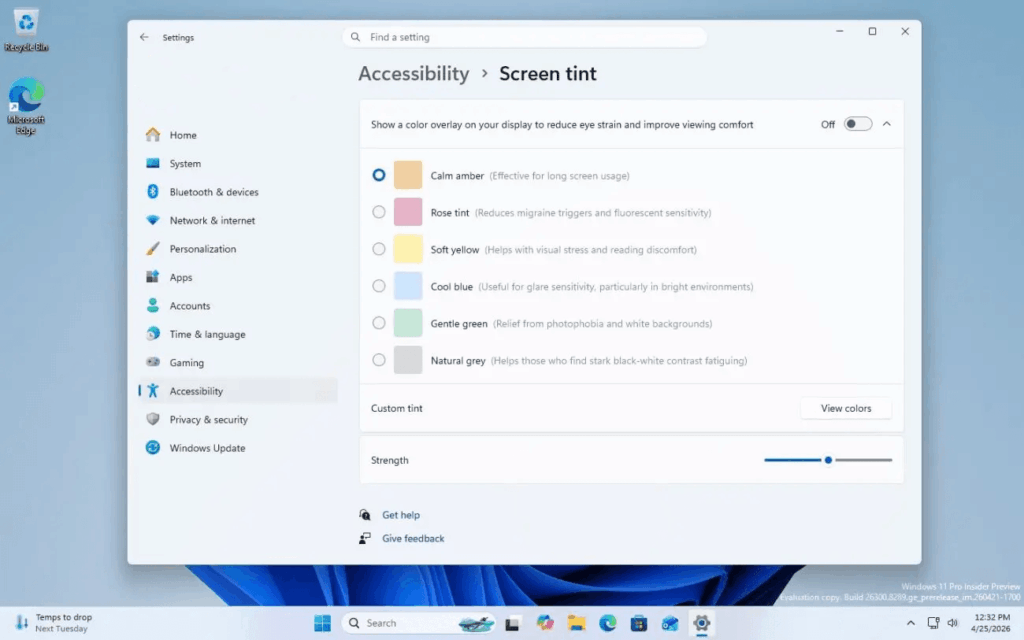
To begin the process, you must open the centralized Windows settings application. You can do this quickly by pressing the Win + I keyboard shortcut. Alternatively, click the Start menu button and select the familiar gear icon. Once the settings panel appears, look at the left sidebar navigation menu. From there, select the Accessibility category to view advanced user options.
Next, scroll down to the dedicated Vision section on the right side of the window. Click directly on the new Screen Tint sub-menu option to open its customization page. You will see a master toggle switch located right at the top of the interface. Flip this switch to the On position to initialize the desktop overlay software system. Your monitor will instantly shift to the default color template choice.
Selecting the Perfect Color Preset
Microsoft provides six scientifically formulated color presets to accommodate different types of light sensitivities. Each option targets a distinct visual discomfort issue common among modern computer users.
- Calm Amber: This shade mimics classic evening modes and directly reduces harsh blue light frequencies.
- Rose Tint: Specifically designed to assist individuals who suffer from severe migraine triggers.
- Soft Yellow: This choice provides a warm paper-like appearance that heavily eases long reading tasks.
- Cool Blue: Excellent for users who need to combat intense reflection glare from glossy screens.
- Gentle Green: Offers cooling relief for individuals dealing with intense medical photophobia symptoms.
- Natural Grey: Softens stark black-and-white contrast levels without altering the underlying core colors.
To change presets, simply click on any of the colored blocks inside the settings window. Windows changes the display look instantly so you can evaluate the immediate visual impact. Take your time testing each shade under your normal room lighting conditions.
Dialing in the Intensity Slider
After picking a preset color block, you must adjust the overall strength of the effect. Locate the horizontal Tint Strength slider located directly beneath the preset color grid. Dragging the slider to the left creates a very subtle wash of translucent color. Conversely, dragging it to the right increases the overlay opacity to full saturation levels.
💡 Pro-Tip: Start your customization with a low strength value between 10% and 15%. This subtle level allows your eyes to adapt naturally without causing immediate color distortion.
Gradually increase the slider percentage until your display feels comfortable to look at. If text characters start looking blurry, you have pushed the strength slider too far. Find a balanced midpoint that reduces glare while maintaining solid text readability.
Advanced Customization: Creating Custom Colors
Mixing Your Own Hex Code Shades
If the six stock presets do not satisfy your eyes, you can create a custom display tint. Scroll down further on the configuration page to locate the advanced Custom Tint options area. Click the button labeled View Colors to launch the integrated Windows color picker tool. This panel displays a full spectrum grid alongside detailed saturation tuning controls.
You can drag the selector crosshair across the canvas to mix any custom shade you want. For precise adjustments, enter exact RGB values or hex codes into the manual text input fields. This precise control helps you match specific therapeutic tints recommended by eye care professionals. Once you find the perfect tone, click the Done button to apply your new creation.
Testing Custom Tints Under Different Workloads
Your custom color overlay might look fantastic on a empty desktop background canvas. However, you must verify how it handles your actual daily productivity software applications. Open a large Microsoft Excel spreadsheet filled with tiny numerical data sets. Check if you can still distinguish between grid lines and highlighted cell areas.
Next, launch your favorite web browser and visit several text-heavy media websites. Ensure that the background color modification does not completely wash out dark text fonts. If you experience reading difficulties, return to settings and adjust your custom color’s saturation level. True optimization requires a small amount of trial and error across different programs.
Practical Applications for Tech Professionals
Optimizing for Software Developers and Editors
Software developers spend hours reading lines of code inside dark or light integrated development environments. White text on dark backgrounds can cause a visual phenomenon called “halation” or text bleeding. By applying a subtle Natural Grey or Gentle Green overlay, you can diminish this annoying glowing effect. Consequently, code characters look sharper and cause less muscle strain inside your eyelids.
Similarly, content writers and video editors often face extreme fatigue during extended editing marathons. A soft, custom-mixed cream color can simulate the natural look of physical book paper. This configuration keeps your nervous system calm during heavy deadline pushes. Check the latest updates on the Windows Insider Blog to see upcoming automation tools for this feature.
Benefits for Gamers in Low-Light Rooms
Many PC gamers enjoy playing immersive titles inside completely dark rooms late at night. However, sudden flashes of bright light from explosions can cause intense temporary visual shock. Activating a low-strength Calm Amber overlay establishes a baseline buffer for your vision. It prevents extreme contrast swings from overworking your pupils during fast-paced gaming action sequences.
Furthermore, the native screen tint does not introduce any measurable controller input latency. This fact gives it a massive advantage over older legacy screen overlay tools. You can maintain your competitive response times while protecting your physical eye health. It provides a true win-win scenario for dedicated desktop gaming enthusiasts everywhere.
Troubleshooting Common Issues
Handling Screen Flickering Problems
Because this feature is currently in active development, early testers might experience minor technical bugs. Some users report occasional screen flickering when switching between full-screen apps and the desktop. If this happens to your machine, try updating your graphics card drivers immediately. Visit the official manufacturer websites for NVIDIA, AMD, or Intel to grab the latest software builds.
Additionally, disabling hardware acceleration inside problematic web browsers can sometimes stop the flickering entirely. If the problem persists, toggle the main Screen Tint switch off and back on again. This quick action reinitializes the system rendering pipeline and usually clears up temporary visual glitches. For deeper operating system analysis, read technical reviews on TechRadar Guide and Windows Central News.
What to Do If Colors Look Wrong
Occasionally, the system might apply your chosen tint color unevenly across connected displays. This issue typically occurs if you use mismatched monitors with different high-dynamic-range profiles. To resolve this, navigate to your system display settings and temporarily disable HDR mode. High-dynamic-range signals can sometimes override the accessibility overlay rendering process.
| Issue | Potential Cause | Quick Solution |
| Screen Flickering | Outdated Graphics Driver | Install latest GPU package |
| Color Distortion | Active HDR Mode | Toggle HDR off in Settings |
| Feature Grayed Out | Color Filters Enabled | Disable Color Filters first |
You can also try resetting the custom color selection back to the default factory settings. Open the color picker tool and select a standard, low-saturation preset block. This step clears any corrupt configuration profiles saved in the Windows registry database. If you want more background context on these bugs, look at BetaNews Coverage.
Final Thoughts
Prioritizing Your Long-Term Digital Health
The new Windows 11 Screen Tint tool represents a fantastic step forward for native operating system accessibility. Microsoft clearly recognizes that modern professionals work under demanding, high-glare visual environments every single day. By integrating these complex color overlays directly into core settings, they make eye comfort accessible to everyone. You no longer need to rely on clunky, unoptimized third-party apps to protect your eyes.
However, remember that software tools form only one part of a healthy digital workspace routine. You should still take regular physical breaks from staring at your desktop monitor. Combine this excellent software tint with the classic 20-20-20 rule for optimal long-term vision health. Your eyes will definitely thank you after a long, productive week at the office.
What are your thoughts on this brand new accessibility addition to the Windows platform? Have you noticed a real reduction in your daily eye fatigue since turning it on? Drop a comment below and share your favorite custom color configurations with our community!