Why “Just Any RAM” Won’t Cut It
Imagine you’ve just splurged on a sleek new gaming rig or a high‑performance workstation, only to discover it boots up sluggishly, crashes during intensive tasks, or refuses to recognize the memory you just installed. The culprit? Incompatible RAM.
Memory (RAM) is the heart‑beat of every computer, and like any good partnership, it needs to be a perfect match. From DDR generations to voltage requirements, a single mismatch can turn a dream build into a headache. In this guide we’ll demystify RAM compatibility, walk you through the exact steps to verify that your memory will work flawlessly with your system, and give you practical tips to keep your upgrade path open for years to come.
Whether you’re a first‑time builder, a seasoned overclocker, or a laptop‑upgrade enthusiast, read on for a comprehensive, SEO‑friendly roadmap that will make picking the right RAM as easy as copying and pasting a command.
1. Understanding RAM Standards, Form Factors & Capacities
1.1 DDR, DDR2, DDR3, DDR4, DDR5 – What’s the Difference?
- DDR (Double Data Rate): The original standard, now obsolete for new builds.
- DDR2 & DDR3: Still found in older desktops and laptops; not interchangeable with newer motherboards.
- DDR4: Mainstream standard for most consumer PCs (2020–2024). Operates at 1.2V with speeds ranging from 2133 MT/s to 4800 MT/s.
- DDR5: Next-gen memory debuting in 2021 and gaining rapid adoption in 2023–2024. Runs at 1.1V, supports speeds beyond 6000 MT/s, and introduces on-die ECC for improved stability.
💡 Key Takeaway: A motherboard designed for DDR4 cannot accept DDR5 modules (and vice versa). The physical key notch prevents accidental insertion, but always double-check your specs.
1.2 Form Factors: DIMM vs. SO-DIMM
- DIMM (Dual In-Line Memory Module): 288 pins — used in desktops and workstations.
- SO-DIMM (Small Outline DIMM): 260 pins — standard for laptops, mini-PCs, and compact desktops (e.g., Intel NUC).
Important: Laptop upgrades require SO-DIMM modules. Full-size DIMMs will not fit.
1.3 Capacity Limits: How Much Is Too Much?
- Per-Module Capacity: Modern DDR4 DIMMs max out at 32 GB, while DDR5 supports up to 64 GB per stick.
- Total System Capacity: Determined by the motherboard’s chipset and CPU memory controller.
- Example: Mainstream Intel Z690 boards support up to 128 GB (4 × 32 GB), whereas high-end AMD X670E boards can handle 256 GB (8 × 32 GB).
💡 Action Step: Note down your motherboard model and check the manufacturer’s website for the official “maximum RAM capacity” before buying.
2. Checking Motherboard Specifications – The Compatibility Checklist
2.1 Locate the Official QVL (Qualified Vendors List)
Most motherboard manufacturers publish a QVL listing pre-tested RAM modules. While unlisted memory kits often work fine, the QVL provides a guaranteed starting point.
How to Use the QVL:
- Visit your motherboard’s official product page.
- Navigate to the Memory or Support tab.
- Open or download the QVL list.
- Match your RAM details: type (DDR4/DDR5), speed (e.g., 3200 MT/s), and module size (e.g., 16 GB).
2.2 Verify RAM Slots and Channel Architecture
- Dual-Channel: Most consumer motherboards offer 2 or 4 slots, enabling dual-channel mode for optimal performance.
- Quad-Channel: Typically reserved for High-End Desktop (HEDT) and workstation platforms (e.g., Intel X299, AMD Threadripper).
💡 Best Practice: Install RAM in matching pairs or quads. If using 2 modules on a 4-slot board, populate slots 2 & 4 (or consult your manual) to ensure dual-channel operation.
2.3 Voltage & Timing Compatibility
- Standard Operating Voltages:
- DDR4: 1.2V standard (high-performance kits may run up to 1.35V).
- DDR5: 1.1V standard (overclocked kits may reach 1.25V+).
- Timings (CAS Latency / CL): Expressed as
CL16-18-18-38. Lower numbers mean tighter latency but may require manual BIOS adjustments.
💡 Actionable Tip: Standard voltage defaults to “Auto” in BIOS. For overclocked or high-speed RAM, enable XMP (Intel) or DOCP/EXPO (AMD) in the BIOS to automatically apply rated speeds, voltage, and timings.
2.4 BIOS/UEFI Firmware Updates
A newer BIOS version frequently adds support for higher memory speeds or newly released RAM densities.
Quick Compatibility Checklist:
- [ ] Identify exact motherboard model (e.g., ASUS ROG Strix Z690-E).
- [ ] Download the latest BIOS file from the official product page.
- [ ] Read the BIOS changelog to confirm added support for desired RAM speeds (e.g., “Added support for DDR5-5600”).
3. Matching RAM to Your CPU – The Often-Overlooked Link
3.1 Integrated Memory Controller (IMC) Limits
Modern CPUs contain an integrated memory controller, meaning the CPU dictates the maximum official RAM speed and capacity—not just the motherboard.
| CPU Family | Max Official DDR4 Speed | Max Official DDR5 Speed | Max Capacity |
| Intel 12th-Gen (Alder Lake) | DDR4-3200 | DDR5-4800 (DDR5-5600+ via OC) | 128 GB |
| Intel 13th-Gen (Raptor Lake) | DDR4-3200 | DDR5-5600 (DDR5-6000+ via XMP) | 128 GB |
| AMD Ryzen 5000 (Zen 3) | DDR4-3200 | — | 128 GB |
| AMD Ryzen 7000 (Zen 4) | — | DDR5-5600 | 128 GB |
⚠️ What This Means: Even if your motherboard supports DDR5-6000, an Intel 12th-Gen CPU will run it at DDR5-4800 by default unless you enable XMP.
3.2 Real-World Performance vs. Spec Speed
Higher speeds show diminishing returns past a certain point. For optimal price-to-performance in gaming and general workloads:
- DDR4 Sweet Spot: 3600 MT/s
- DDR5 Sweet Spot: 5600–6000 MT/s
💡 Action Step: Use memory compatibility tools (such as Crucial’s System Scanner) to cross-reference your CPU and motherboard for optimal speed recommendations.
3.3 ECC vs. Non-ECC Memory
- Non-ECC: Standard for consumer PCs, gaming, and everyday desktop use.
- ECC (Error-Correcting Code): Required for enterprise servers and specialized workstations to prevent data corruption. Most consumer CPUs (Intel Core, AMD Ryzen) do not support active ECC memory mode.
4. Installing and Testing Your New RAM
4.1 Physical Installation Tips
- Shut down the PC, flip the PSU switch off, and disconnect the power cable.
- Open the case side panel and locate the DIMM slots.
- Push open the retention clips on the RAM slots.
- Align the notch on the RAM stick with the key ridge in the slot.
- Press down firmly on both ends until the clips snap back into place automatically.
💡 Pro Tip: When installing 2 modules on a 4-slot motherboard, populate the second and fourth slots relative to the CPU socket to enable dual-channel performance.
4.2 First-Boot Verification
Upon turning on the system, enter the BIOS/UEFI immediately:
- Verify that total capacity matches your installed RAM amount.
- Check the Memory Frequency field (displays actual speed or half of base clock rate).
- Troubleshooting: If the system fails to POST, reseat the memory modules or test one stick at a time to isolate faulty hardware.
4.3 Enabling XMP / DOCP / EXPO
To reach the full advertised speed of high-performance RAM:
- Intel Platforms: Enable XMP (Extreme Memory Profile) under AI Overclock Tuner or Memory Settings.
- AMD Platforms: Enable DOCP (Direct Over Clock Profile) or EXPO (Extended Profiles for Overclocking).
Saving and exiting will reboot the system with the memory running at its advertised speed, voltage, and timings.
4.4 Stress‑Testing for Stability
Use free tools to ensure your RAM is stable:
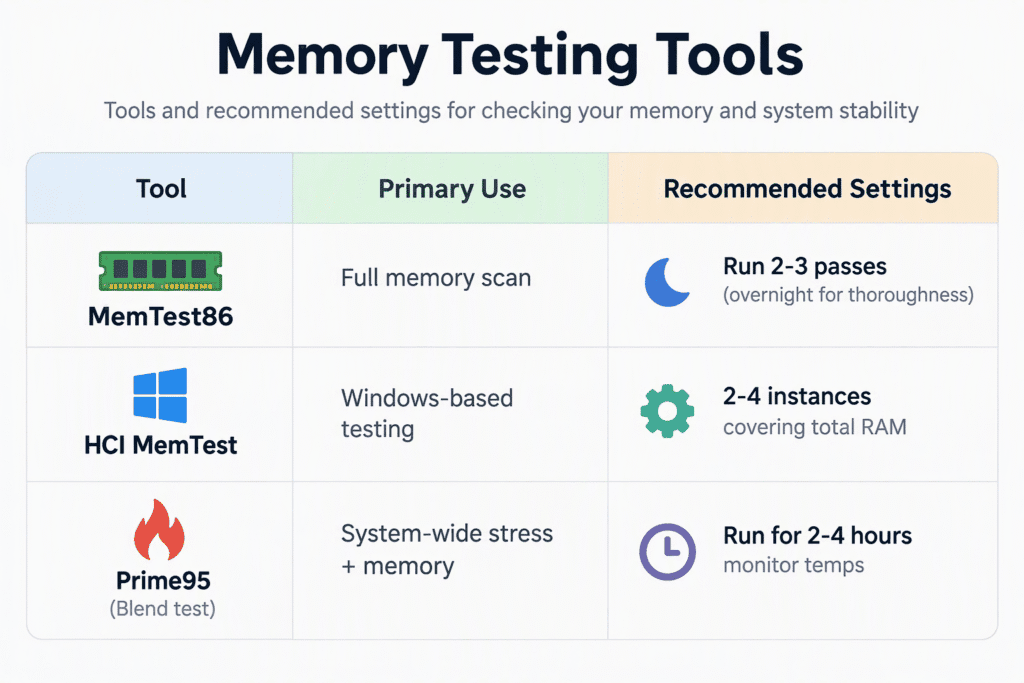
If errors appear, either lower the XMP profile (e.g., run at 3200 MT/s instead of 3600 MT/s) or increase the DRAM voltage slightly (within safe limits – 1.35 V for DDR4).
5. Future‑Proofing Your Build – Planning for the Next Upgrade
5.1 Choose a Motherboard with Extra Slots
If you anticipate needing more memory later, pick a board with four DIMM slots even if you start with a 2‑module kit. This allows a painless upgrade to 32 GB or 64 GB without replacing existing sticks.
5.2 Stick to the Same Speed and Timing Family
When adding modules later, match the speed (MT/s), CAS latency, and voltage of the existing kit. Mixing different speeds forces the system to run at the lowest common denominator, potentially wasting performance.
5.3 Keep an Eye on Emerging Standards
DDR5 is still maturing; by 2027 many mainstream platforms will have fully embraced DDR5‑6600 and beyond. If you’re building today and want to avoid a full memory overhaul in a few years, consider a DDR5‑5600 kit now, which will still be relevant when you upgrade the CPU or motherboard later.
5.4 Consider RAM with Heat Spreaders for Overclocking
If you plan to push memory beyond the rated XMP profile, modules with aluminum heat spreaders help dissipate heat, reducing the risk of throttling or errors.
Conclusion: Key Takeaways for Seamless RAM Compatibility
- Identify the exact RAM type your motherboard and CPU require (DDR4 vs. DDR5, DIMM vs. SO‑DIMM).
- Consult the QVL and BIOS updates to ensure the chosen kit is officially supported and that your firmware is current.
- Match speed, voltage, and timings to both the motherboard and CPU’s integrated memory controller, and enable XMP/DOCP for optimal performance.
- Install modules correctly, verify detection in BIOS, and run stress‑tests (MemTest86, Prime95) to confirm stability.
- Future‑proof by selecting a board with extra slots, buying matching‑spec modules, and keeping an eye on emerging DDR5 speeds.
By following this step‑by‑step roadmap, you’ll eliminate the guesswork, avoid costly incompatibility issues, and unlock the full potential of your system’s memory. Happy building, and may your frames stay smooth and your workloads run lightning‑fast!