Managing system updates efficiently keeps your hardware secure and optimized. As Windows 11 24H2 nears its end-of-life deadline, upgrading to Windows 11 25H2 becomes essential. Fortunately, Microsoft built version 25H2 on the same underlying servicing branch as 24H2. Consequently, you do not need to perform a lengthy operating system reinstall. You can deploy a lightweight enablement package to unlock new feature capabilities immediately.
In this complete walkthrough, we will cover how to trigger the Windows 11 25H2 update manually. Furthermore, we will explain how this quick installation process saves time and prevents system instability.
Understanding the Windows 11 25H2 Enablement Package
Microsoft periodically delivers feature updates using two distinct methods. Major updates historically required a full OS replacement, which took significant bandwidth and time. However, smaller incremental releases utilize a specialized eKB (enablement package) mechanism.
What Is an Enablement Package?
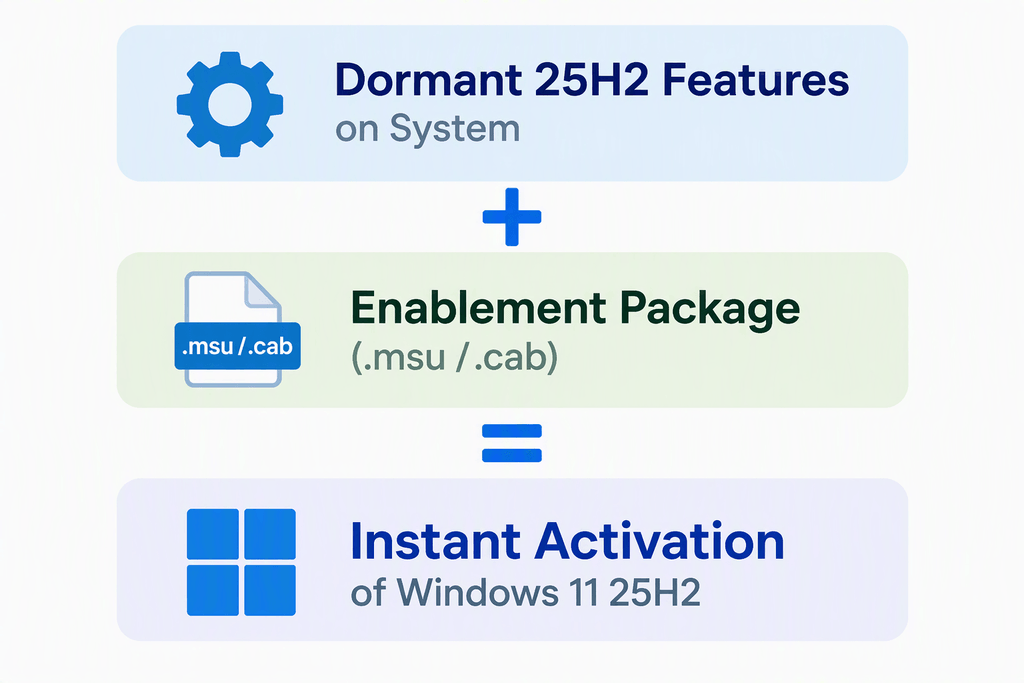
An enablement package acts as a master toggle switch for your operating system. Microsoft actually delivers all version 25H2 code to your computer through regular monthly cumulative updates. However, those features remain dormant inside the system files.
When you install the small enablement package file, it flips those feature flags to an active state. Therefore, the download takes only a few megabytes. The entire installation finishes within minutes, requiring just a single standard system restart.
- Fast Deployment: Downloads complete in seconds due to minimal file size.
- Low System Impact: The system updates without rebuilding core Windows system folders.
- Shared Servicing Stack: Versions 24H2 and 25H2 share identical monthly cumulative update files.
Why Upgrade Before 24H2 Reaches End-of-Life?
Operating systems receive monthly security patches only while supported by Microsoft. Once Windows 11 24H2 reaches its formal end-of-service milestone, Microsoft stops issuing critical vulnerability fixes for that build.
Staying on an unpatched build leaves your hardware vulnerable to emerging online threats and exploits. Therefore, transitioning early ensures continuous protection while minimizing potential workflow disruptions later.
Prerequisites Before Forcing the Update
Before applying any update package, you must prepare your computer properly. Following these preliminary steps guarantees a smooth upgrade experience without unexpected software errors.
- Verify Your Current Version: Open Settings > System > About to confirm you run version 24H2.
- Install Latest Cumulative Updates: Ensure your machine runs the most recent cumulative update package available.
- Back Up Important Data: Always create a system restore point or store critical files on secondary drives.
- Free Up Disk Space: Although the enablement package is small, Windows requires working room for temporary files.
⚠️ Warning: Attempting to force a 25H2 enablement package on Windows 11 23H2 or older builds will fail. The enablement package requires the specific 24H2 codebase baseline to function correctly.
Method 1: Force Update via Windows Update Settings
The simplest strategy involves using the built-in update management interface inside Windows settings. Microsoft provides an option to prioritize early feature deployments directly on consumer devices.
Step-by-Step Instructions
- Press Windows Key + I to open the Settings app.
- Select Windows Update from the left navigation menu.
- Toggle the option labeled “Get the latest updates as soon as they’re available” to On.
- Click the Check for updates button on the top right.
Settings ➔ Windows Update ➔ Enable "Get updates as soon as available" ➔ Check for Updates
If Microsoft designated your hardware configuration as ready, the Windows 11 25H2 update will begin downloading automatically. You can review current deployment recommendations on the official Microsoft Windows Update Service Guide.
Method 2: Manually Install the Enablement Package (KB File)
If Windows Update does not show the feature update automatically, you can install the standalone package manually. System administrators often use this method to update offline machines or skip rollout throttling.
Downloading the Official MSU File
You can obtain the explicit MSU file directly from Microsoft repositories. Always verify that you download system updates from genuine Microsoft sources to protect your machine.
- Access the official Microsoft Update Catalog website.
- Search for the specific 25H2 enablement package KB identifier.
- Choose the architecture matching your machine (x64 or ARM64).
- Save the
.msuupdate file to your primary drive.
Installing via Command Line Interface
While you can double-click the downloaded .msu file, executing it via Command Prompt provides better control and error feedback.
wusa.exe C:\Path\To\Windows11.0-KB5065426-x64.msu /quiet /norestart💡 Pro-Tip: Run Command Prompt or PowerShell with full administrative privileges before executing servicing commands. Omitting elevated permissions causes update installation failures.
For detailed command options when using wusa.exe, consult the comprehensive Microsoft Command Line Utility Documentation.
Method 3: Deploy via PowerShell and DISM Tool
Advanced users can inject enablement cabinet (.cab) packages directly into the operating system servicing engine. This process bypasses standard update queue checks entirely.
Extracting and Injecting Package Code
- Place your downloaded enablement package inside a dedicated folder (e.g.,
C:\Update). - Right-click the Start Menu button and select Terminal (Admin) or PowerShell (Admin).
- Run the following Deployment Image Servicing and Management (DISM) command:
Dism /Online /Add-Package /PackagePath:"C:\Update\Windows11.0-KB5065426-x64.cab"The terminal interface will display progress percentages as DISM integrates the servicing package into your running Windows build. Once DISM reports success, type Y when prompted to restart your system immediately. You can review advanced DISM syntax options inside the Microsoft DISM Overview Guide.
Troubleshooting Common Enablement Package Errors
Even streamlined updates can occasionally encounter system errors during deployment. The following table highlights common errors alongside effective troubleshooting solutions.
| Error Code / Issue | Root Cause | Recommended Fix |
| 0x800f081f | Missing prerequisite cumulative update | Install the latest monthly cumulative update first. |
| 0x80070002 | Corrupted update cache files | Clear the C:\Windows\SoftwareDistribution folder. |
| Package Not Applicable | Running incorrect baseline version | Confirm system runs 24H2, not 23H2 or older. |
Resetting Windows Update Components
If installation failures persist, resetting the core update components often resolves hidden file corruption:
- Open PowerShell as an administrator.
- Stop the update services by entering:
net stop wuauserv net stop bits - Rename the update download cache directory:
Rename-Item C:\Windows\SoftwareDistribution SoftwareDistribution.old - Restart the update services:
net stop wuauserv net stop bits
To learn more about troubleshooting Windows system health, read the Microsoft System File Checker Guide.
Final Thoughts & Conclusion
Upgrading your PC before software support ends ensures robust system security and uninterrupted functionality. By utilizing the official enablement package, you can bypass long installation times and upgrade to Windows 11 25H2 seamlessly. Whether you use standard settings, direct MSU files, or DISM commands, keeping your operating system current protects your digital workspace.
Have you successfully upgraded your system to version 25H2 using the enablement package method? Share your experience, ask questions, or post your installation tips in the comments section below! Don’t forget to share this guide with fellow tech enthusiasts on social media!