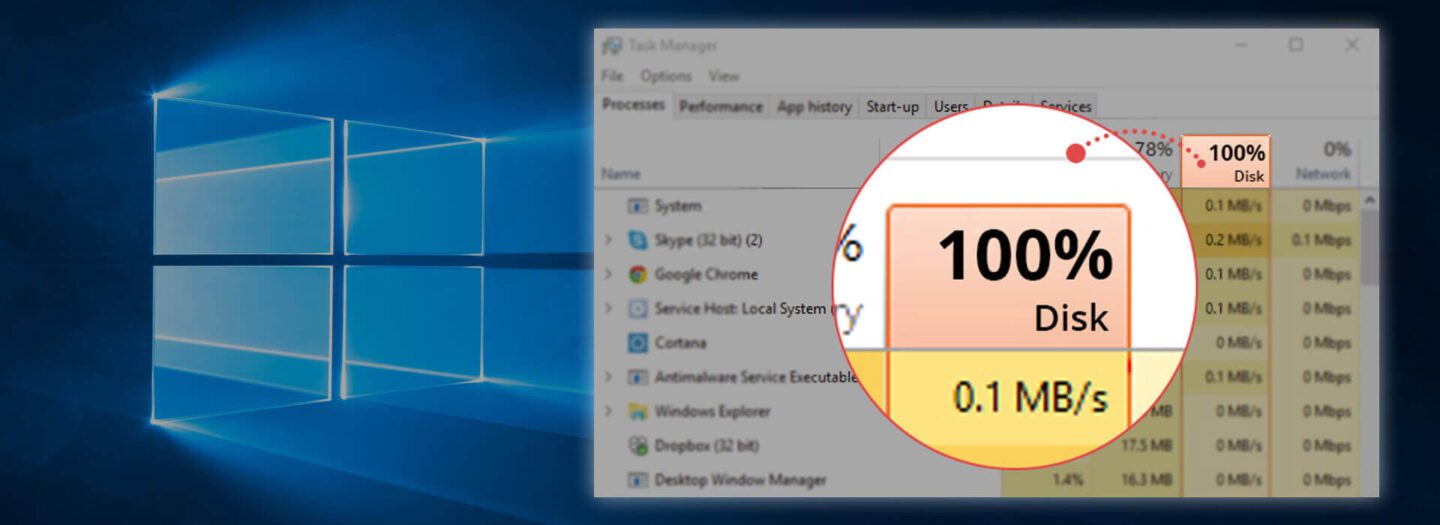
Is your Windows 11 computer running painfully slow, even when you barely have any applications open? You open Task Manager and discover your disk usage stuck at 100%. Applications take forever to launch, File Explorer freezes, and even basic tasks become frustrating. Fortunately, you can often fix 100% disk usage in Windows 11 without reinstalling the operating system.
This problem commonly affects older computers with mechanical hard drives, although SSD-based systems can experience it too. Windows constantly reads and writes data while running background services, installing updates, and managing virtual memory. When these operations overwhelm your storage device, the computer can become unresponsive. However, 100% disk usage does not automatically mean your hard drive is failing.
One important detail many Windows users misunderstand is what Task Manager actually measures. Its disk percentage represents active time, not how much storage space you have consumed. A drive can reach 100% active time while transferring surprisingly little data. This often happens when the storage device struggles to complete requests quickly.
Several components can contribute to Windows 11 high disk usage. These include SysMain, Windows Search indexing, startup applications, storage drivers, and Windows updates. Hardware deterioration can also produce persistent storage performance problems. Therefore, identifying the actual cause matters more than randomly disabling Windows features.
In this guide, I’ll walk you through eight practical troubleshooting methods. We’ll begin with built-in diagnostic tools before investigating background services, system corruption, and storage health. Most fixes require no additional software, and you can reverse many changes if necessary. The goal is straightforward: restore normal disk performance without reinstalling Windows 11.
1. Identify What’s Causing 100% Disk Usage Using Task Manager
Before changing anything, determine which processes are consuming your disk resources. This is the first step I recommend when troubleshooting a sluggish Windows computer. Without identifying the responsible process, you could disable useful services without improving performance. Fortunately, Windows 11 includes powerful diagnostic tools.
Check Disk Usage in Task Manager
Task Manager provides a quick overview of system resource consumption. It displays CPU, memory, disk, and network activity in real time. More importantly, it helps identify applications generating excessive storage operations. Follow these steps:
- Press Ctrl + Shift + Esc to open Task Manager.
- Select Processes from the left sidebar.
- Locate the Disk column.
- Click its heading to sort processes by disk activity.
- Identify processes that consistently appear near the top.
- Select Performance → Disk 0 to examine overall storage activity.
Pay attention to processes such as System, Antimalware Service Executable, and Service Host. Third-party applications may also generate considerable disk traffic. However, high activity during updates or antivirus scans can be perfectly normal. Persistent saturation without an obvious workload deserves closer investigation.
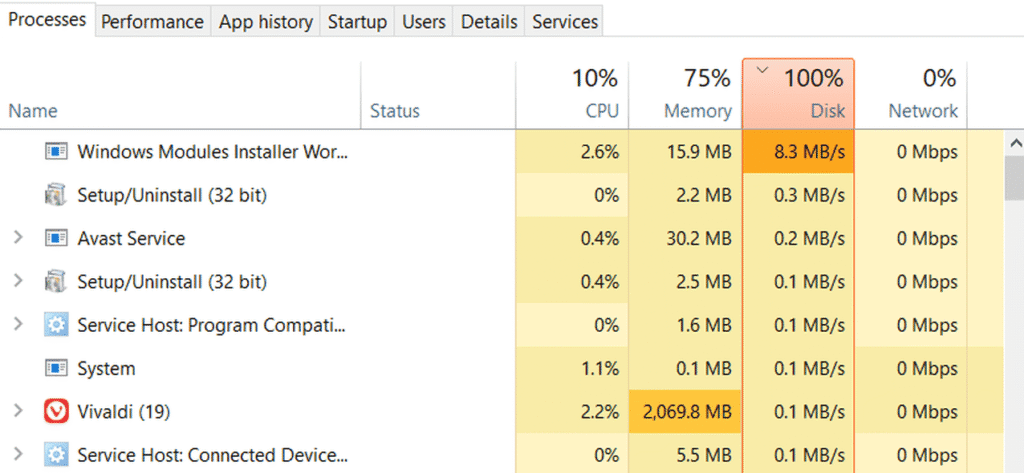
Remember that the Processes tab and Performance tab show different measurements. Individual processes display disk transfer rates, while the Disk heading summarizes overall utilization. Meanwhile, the Performance tab displays active time and average response time. These measurements help explain why a drive appears overloaded.
Use Resource Monitor for Deeper Disk Analysis
Task Manager identifies busy applications, but Resource Monitor provides more detailed information. It displays individual file activity, read/write rates, and storage response times. This helps distinguish normal background operations from genuine storage bottlenecks. You can launch it without installing additional software.
- Press Windows + R.
- Type
resmonand press Enter. - Select the Disk tab.
- Expand Processes with Disk Activity.
- Examine the files listed under Disk Activity.
- Review the Storage section for response times and active time.
Look closely at the Total (B/sec) and Response Time (ms) columns. High response times indicate that storage requests take longer to complete. However, interpretation depends on your drive type and workload. A mechanical HDD will generally respond slower than a modern SSD.
For example, a mechanical HDD might show 100% active time despite transferring relatively little data. This often indicates excessive random access or storage latency. Conversely, a large file transfer may generate substantial throughput without causing serious responsiveness problems. Understanding that difference helps narrow your investigation.
💡 Pro-Tip: Record Your Disk Performance Before Changing Settings
Before applying any fix, observe your computer for several minutes under normal conditions. Record these measurements:
- Disk active time: Check whether utilization remains near 100%.
- Average response time: Look for consistently slow storage responses.
- Disk throughput: Compare actual read/write activity against utilization.
- Top processes: Identify applications generating repeated disk operations.
- Drive type: Confirm whether Windows runs on an HDD or SSD.
Repeat the same observations after each troubleshooting step. This approach helps identify which adjustment actually improves performance. It also prevents unnecessary changes to functioning Windows services.
Microsoft’s Windows performance improvement guide provides additional recommendations for diagnosing sluggish systems.
2. Check and Troubleshoot the SysMain Service
The SysMain service, previously called Superfetch, helps Windows optimize application loading and system responsiveness. It monitors usage patterns and supports memory management optimizations. Normally, this service operates quietly in the background. However, its activity can contribute to storage contention on some computers.
This becomes more noticeable on older systems with mechanical hard drives. These drives handle random read and write operations much slower than modern SSDs. Consequently, background disk activity can compete with applications for limited storage performance. The result may include freezing, delayed application launches, or sluggish navigation.
Nevertheless, SysMain does not cause every disk usage problem. Disabling it permanently without testing may sacrifice useful performance optimizations. Instead, temporarily stop the service and observe your computer’s behavior.
How to Temporarily Stop SysMain
Windows allows you to manage SysMain through the Services console. You don’t need registry modifications or third-party optimization tools. Follow these steps:
- Press Windows + R.
- Type
services.mscand press Enter. - Scroll down and locate SysMain.
- Double-click the service.
- Under Service status, click Stop.
- Click Apply, then OK.
- Return to Task Manager and monitor disk activity.
Allow the system several minutes to settle before checking the results. Other background processes may continue generating disk traffic. Therefore, compare performance under similar conditions rather than relying on one reading. Repeat the tasks that previously caused the slowdown.
If disk activity drops significantly, SysMain may be contributing to the problem. However, this result doesn’t necessarily identify the underlying bottleneck. An aging HDD or excessive background workload may still explain the poor performance. Treat this adjustment as a diagnostic test.
Should You Disable SysMain Permanently?
Some troubleshooting guides recommend disabling SysMain whenever disk usage reaches 100%. I would avoid making that your first permanent adjustment. Modern Windows versions generally manage background optimization effectively. Disabling useful services without clear evidence can introduce unnecessary trade-offs.
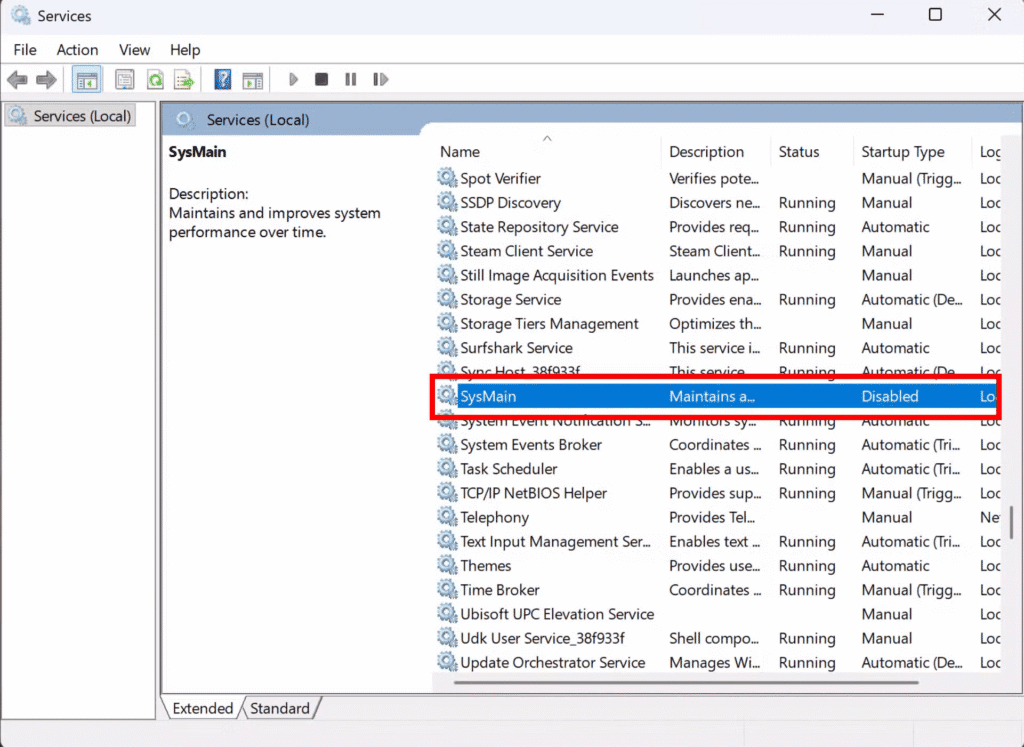
If stopping SysMain produces no measurable improvement, open its properties again and click Start. Leave the original startup configuration unchanged. If testing consistently shows improvement, investigate the underlying storage workload before considering a longer-term change. Avoid disabling unrelated Windows services during the process.
The goal is not to shut down everything Windows runs. Instead, identify which specific activity causes excessive storage demand. That distinction makes troubleshooting safer and more effective.
3. Reduce Windows Search Indexing and Background Disk Activity
Windows Search helps you locate documents, applications, emails, and other content quickly. To accomplish this, Windows maintains a searchable database of indexed files. The indexing process examines file names, properties, and supported file contents. Naturally, this activity requires occasional disk access.
Normally, Windows manages indexing automatically and reduces activity during demanding workloads. However, indexing can become intensive after major updates or significant file changes. Large document collections may also increase the workload. Computers with mechanical hard drives can experience noticeable slowdowns during these operations.
Another possibility involves a damaged search index. Windows may repeatedly process certain files while attempting to maintain its database. Fortunately, you can adjust indexing behavior without completely disabling Windows Search.
Adjust Windows Search Indexing Locations
Reducing unnecessary indexing locations can lower background disk activity. This works particularly well when your computer stores large archives or rarely accessed files. Rather than indexing everything, focus on folders you frequently search.
- Press Windows + I to open Settings.
- Navigate to Privacy & security → Search or Searching Windows, depending on your build.
- Locate the file search settings.
- Select Classic indexing if you don’t need Enhanced indexing.
- Review the available excluded folder settings.
- Exclude directories that don’t require frequent searching.
Consider excluding old backups, archived downloads, or large folders containing temporary files. However, avoid excluding directories you search regularly. Removing locations from indexing can make searches slower or less complete. Your objective is reducing unnecessary background activity while preserving useful search functionality.
Windows also provides advanced indexing controls. Open Advanced indexing options and select Modify to review included locations. From there, adjust which folders Windows indexes. Microsoft’s Windows Search documentation explains these settings and indexing behavior.
Rebuild the Search Index When Necessary
Sometimes, adjusting indexing locations doesn’t resolve abnormal search-related activity. A damaged database may also produce incomplete search results or repeated indexing errors. In these cases, rebuilding the index can help restore normal behavior. However, this operation temporarily increases disk activity.
To rebuild the index:
- Open Settings → Privacy & security → Search or Searching Windows.
- Select Advanced indexing options.
- Click Advanced.
- Locate the Troubleshooting section.
- Click Rebuild.
- Confirm the operation.
The rebuilding process may take considerable time, depending on your files and storage speed. Search results may remain incomplete until Windows finishes processing everything. Therefore, avoid repeatedly rebuilding the index whenever disk usage increases. Use this option when search corruption or persistent indexing problems justify it.
🎯 Important: Rebuilding the index is not an immediate disk usage fix. It generates additional disk activity while Windows reconstructs its database. Also, completely disabling Windows Search can reduce search functionality. Adjust indexing locations before considering service-level changes.
4. Disable Unnecessary Startup Applications and Background Processes
Many Windows 11 performance problems begin before you open your first application. Numerous programs configure themselves to launch automatically when Windows starts. Some check for updates, synchronize files, or load background services immediately. Individually, these activities may seem harmless, but their combined disk activity can become substantial.
This problem is especially noticeable on computers running mechanical hard drives. Multiple applications compete for disk access while Windows finishes loading essential components. Consequently, the system may remain sluggish several minutes after signing in. Reducing unnecessary startup activity can improve responsiveness.
However, not every startup application needs disabling. Security software, essential device utilities, and business applications may require background operation. Focus on optional programs rather than aggressively disabling everything.
Disable Startup Programs Through Task Manager
Windows 11 provides direct control over applications that launch automatically. Task Manager also displays startup impact information to help prioritize your investigation. Programs with high startup impact deserve attention, although that rating doesn’t prove persistent disk saturation.
- Press Ctrl + Shift + Esc.
- Select Startup apps.
- Review applications marked Enabled.
- Check the Startup impact column.
- Right-click an unnecessary application.
- Select Disable.
- Restart Windows and monitor disk activity.
Common candidates include gaming launchers, messaging applications, optional update assistants, and unused background utilities. Cloud synchronization software may also generate significant disk activity during large transfers. However, disabling startup entries can delay synchronization and other expected functions. Evaluate each application according to your actual needs.
You can also manage startup programs through Settings → Apps → Startup. Microsoft explains both approaches in its startup application configuration guide.
Identify Background Applications That Continue Running
Disabling a startup entry prevents that application from launching automatically during sign-in. However, some programs install services that operate independently. Others use scheduled tasks or supporting processes. Consequently, startup cleanup alone may not eliminate excessive disk activity.
Return to Task Manager and examine the Processes tab after restarting. Look for backup utilities, synchronization clients, and automatic update programs generating repeated disk operations. These applications may remain active without displaying an open window. Investigate their settings before disabling related services.
For example, a backup application might scan thousands of files during its scheduled maintenance window. Adjusting that schedule may resolve the slowdown without removing the software. Similarly, temporarily pausing cloud synchronization can reveal whether it contributes to the problem. Avoid forcefully ending security processes or essential Windows components.
Perform a Clean Boot to Isolate Software Conflicts
If disk usage remains high, a clean boot can help identify conflicting third-party software. This method starts Windows with essential services and reduced startup activity. Unlike Safe Mode, it provides more control over individual software components. Microsoft recommends this approach for isolating background software conflicts.
Before proceeding, record your existing startup configuration. Avoid performing this test on company-managed computers without appropriate authorization. Some applications require background services for security, networking, or business operations.
Follow these steps:
- Press Windows + R, type
msconfig, and press Enter. - Open the Services tab.
- Check Hide all Microsoft services.
- Click Disable all.
- Select Apply.
- Open the Startup tab and click Open Task Manager.
- Disable enabled startup applications.
- Restart your computer.
After restarting, examine disk activity again. If the problem disappears, a third-party service or startup application likely contributes to it. Re-enable items systematically and restart between tests. Testing groups of services can help narrow the possibilities faster.
Once you identify the culprit, check its configuration or look for an updated version. You might only need to change a backup schedule or synchronization setting. After testing, restore normal startup and re-enable required services. Follow Microsoft’s clean boot instructions for complete isolation and recovery procedures.
Remember that a clean boot is a diagnostic method, not a permanent optimization setting. Running indefinitely with required services disabled can interfere with normal software functionality. Persistent disk saturation during a clean boot suggests investigating system components or storage hardware.
5. Repair Disk Errors and Corrupted Windows System Files
Sometimes, Windows 11 shows 100% disk usage because the operating system encounters file system errors or corrupted components. These problems can interrupt normal storage operations and cause applications to freeze. You might also notice failed updates, unusually long boot times, or frequent system errors. Fortunately, Windows includes several built-in repair utilities.
Three tools deserve particular attention: CHKDSK, DISM, and System File Checker (SFC). Each performs a different diagnostic or repair function. CHKDSK examines file system integrity, while DISM repairs the Windows component store. SFC checks protected Windows system files.
However, these tools cannot repair every storage problem. File system corruption differs from physical disk damage. If your drive shows signs of hardware failure, prioritize backing up your files before running repairs.
Scan Your Drive Using CHKDSK
Windows commonly uses the NTFS file system to organize files and track storage allocations. When file system metadata becomes inconsistent, Windows may encounter errors while accessing files. Unexpected shutdowns and storage interruptions can contribute to these problems. CHKDSK helps identify file system inconsistencies.
To scan your system drive:
- Right-click Start.
- Select Terminal (Admin).
- Enter the following command:
chkdsk C: /scan - Press Enter.
- Wait for Windows to finish scanning.
- Review the reported results.
The /scan parameter performs an online NTFS file system scan. Windows can conduct this check without immediately taking the volume offline. However, some errors may require additional repairs or a restart.
If CHKDSK reports problems requiring correction, you may need:
chkdsk C: /fThe /f parameter instructs CHKDSK to repair file system errors. Because Windows actively uses drive C:, the utility may request a restart. Type Y when prompted and restart when convenient. Allow the repair process to finish. Microsoft’s CHKDSK command reference explains the available parameters and repair behavior.
⚠️ Warning: CHKDSK cannot restore a physically failing hard drive to reliable working condition. Intensive repair operations may also stress unstable storage hardware. If you suspect drive failure, secure your data before attempting repairs.
Repair Windows Components Using DISM
If disk activity remains abnormal, investigate possible Windows component corruption. Damaged operating system files can interfere with updates, services, and routine system operations. DISM helps repair the Windows component store that other repair tools depend on.
Open Terminal (Admin) and enter:
DISM /Online /Cleanup-Image /RestoreHealthPress Enter and allow the process to complete. DISM checks the running Windows installation and attempts to repair component store corruption. It may retrieve replacement files through Windows Update when necessary. Therefore, an internet connection can help the repair succeed.
The operation may appear inactive at certain percentages. Avoid closing the terminal simply because progress seems slow. Completion times depend on your computer’s condition and available resources. Once DISM finishes successfully, proceed with System File Checker.
Run System File Checker to Restore Windows Integrity
System File Checker examines protected Windows files and repairs incorrect versions when suitable replacements exist. This can resolve corruption-related instability or unusual application behavior. However, SFC does not directly optimize disk speed or repair hardware damage.
In the same elevated terminal, enter:
sfc /scannowAllow the verification process to reach 100%. Windows will report whether it found corrupted files or successfully repaired them. Depending on the result, you may need further troubleshooting.
Common results include:
- No integrity violations: SFC found no problems with protected system files.
- Corrupted files repaired: Windows restored one or more protected files.
- Unable to repair some files: Additional investigation may be necessary.
- Could not perform the operation: The utility encountered an error requiring further troubleshooting.
If SFC repairs corrupted files, restart Windows and examine disk activity again. Compare the results against your earlier measurements. Remember that successful repairs do not guarantee lower disk utilization. They simply eliminate one possible cause.
Microsoft recommends running DISM before SFC when repairing system corruption. Its System File Checker guide explains the recommended sequence.
6. Update Storage Drivers and Check Windows Update Activity
Windows communicates with storage devices through drivers and storage controllers. These components manage data requests between the operating system and your HDD or SSD. Driver problems can contribute to excessive latency, failed operations, and system instability. Sometimes, these problems appear as persistent 100% disk usage.
However, outdated drivers do not automatically explain every storage bottleneck. Windows 11 already includes compatible drivers for many common controllers. Replacing a functioning driver without good reason can introduce additional problems. Inspect your configuration before installing updates.
Check Storage Drivers in Device Manager
Device Manager displays installed storage devices and controllers. Depending on your hardware, you may see SATA AHCI, NVMe, Intel RST, or other controller entries. Identifying the correct device helps prevent incompatible driver installations.
- Right-click Start and select Device Manager.
- Expand Disk drives.
- Expand Storage controllers.
- Check IDE ATA/ATAPI controllers if that category appears.
- Right-click the relevant controller and select Properties.
- Open the Driver tab.
- Review the provider, version, and driver date.
Pay attention to warning icons or errors under Device status. These indicators may reveal hardware communication or driver problems. However, normal Device Manager status doesn’t rule out intermittent storage errors.
Update Storage Drivers Safely
If you suspect a driver issue, start with Windows Update or your computer manufacturer’s support website. Manufacturers often provide validated drivers for specific laptop and motherboard models. These packages may contain compatibility fixes or stability improvements.
To check for updates:
- Open Device Manager.
- Right-click the appropriate storage controller.
- Select Update driver.
- Choose Search automatically for drivers.
- Follow any available instructions.
- Restart Windows if necessary.
If Windows finds no newer driver, check the manufacturer’s official support page. Compare versions and review installation instructions before proceeding. Avoid generic driver-update utilities that cannot verify your exact hardware configuration. Microsoft’s Device Manager driver update guide explains supported installation and rollback procedures.
If disk problems began immediately after a driver update, consider restoring the previous version. Open the driver’s properties and check whether Roll Back Driver is available. This option may reverse a problematic update.
🎯 Important: Never switch SATA controller modes between RAID, Intel RST, and AHCI without proper preparation. Such changes can prevent Windows from booting. Also, back up important files before updating storage firmware.
Check Windows Update for Background Disk Activity
Windows Update regularly downloads, verifies, extracts, and installs system updates. These operations can generate substantial disk activity. Older HDD-based systems may experience noticeable slowdowns during installation. However, activity should generally decrease after Windows finishes its work.
To check Windows Update:
- Press Windows + I.
- Select Windows Update.
- Review active downloads and installations.
- Check for pending restarts.
- Open Update history to inspect recent updates.
- Review Advanced options → Optional updates for relevant drivers.
Do not install every optional driver update without reviewing its purpose. Some packages target specific hardware problems rather than general performance improvements. Likewise, avoid interrupting updates simply because Task Manager shows high disk activity.
If Windows Update repeatedly fails, check for error messages and available storage space. Low capacity can prevent updates from completing successfully. Once maintenance finishes, restart Windows and monitor disk activity again.
7. Free Up Disk Space and Optimize HDD or SSD Performance
Running low on storage space can make an already slow Windows 11 computer less responsive. Windows needs available capacity for temporary files, updates, application caches, and virtual memory. When storage becomes critically low, routine operations may struggle to complete.
However, 100% disk usage and a nearly full drive are different problems. Task Manager measures disk active time, while File Explorer displays storage capacity. A drive with plenty of free space can still experience 100% active time. Likewise, a nearly full drive might show relatively little activity.
Therefore, cleanup helps when storage capacity becomes a limiting factor. It also supports smoother updates and temporary-file management. Combine storage cleanup with appropriate drive maintenance rather than treating either as a guaranteed fix.
Remove Unnecessary Files Using Windows Storage Settings
Windows 11 includes built-in storage management tools that identify unnecessary files. These tools can remove temporary data without requiring third-party cleanup software. However, review every category before deleting anything important.
- Press Windows + I.
- Navigate to System → Storage.
- Review storage usage for your system drive.
- Select Temporary files.
- Examine the available cleanup categories.
- Select unnecessary items.
- Click Remove files.
Start with temporary files, thumbnails, and other disposable data. Review the Downloads folder carefully before deleting its contents. Also, check previous Windows installation files before removing them. Deleting those files may eliminate certain rollback options.
Large games, videos, and installation packages can consume considerable storage capacity. Moving personal archives to another drive may help. However, deleting files will not repair failing hardware or malfunctioning storage controllers.
Configure Storage Sense for Automatic Cleanup
Storage Sense helps maintain available space by removing unnecessary temporary files. It can also manage Recycle Bin content according to your configured settings. This reduces the need for frequent manual cleanup.
To configure Storage Sense:
- Open Settings → System → Storage.
- Select Storage Sense.
- Enable automatic cleanup if appropriate.
- Review its available options.
- Configure the cleanup schedule.
- Check Recycle Bin, Downloads, and cloud-content settings.
I recommend keeping automatic deletion conservative. Many users store important documents, installers, and project files inside Downloads. Removing these files automatically may create unnecessary problems. Microsoft’s Storage Sense guide explains cleanup behavior and important limitations.
Optimize Your HDD or SSD Correctly
Not all storage devices benefit from the same maintenance methods. Mechanical hard drives store data on rotating magnetic platters, while SSDs use flash memory. These technologies handle file access differently.
Traditional HDDs can suffer performance penalties when files become fragmented. Defragmentation reorganizes fragmented data to improve access efficiency. However, defragmentation cannot eliminate hardware limitations or repair a defective drive.
SSDs work differently because they don’t rely on mechanical read/write heads. Windows uses TRIM and appropriate maintenance operations to support efficient flash storage management. The operating system normally schedules these operations automatically.
To check optimization status:
- Open Windows Search and type
defrag. - Select Defragment and Optimize Drives.
- Locate your system drive.
- Check the Media type column.
- Review the optimization status.
- Select Optimize if appropriate.
Windows normally determines the appropriate optimization method for your drive. HDDs receive defragmentation, while SSDs receive suitable maintenance operations. Microsoft’s drive optimization documentation explains the difference.
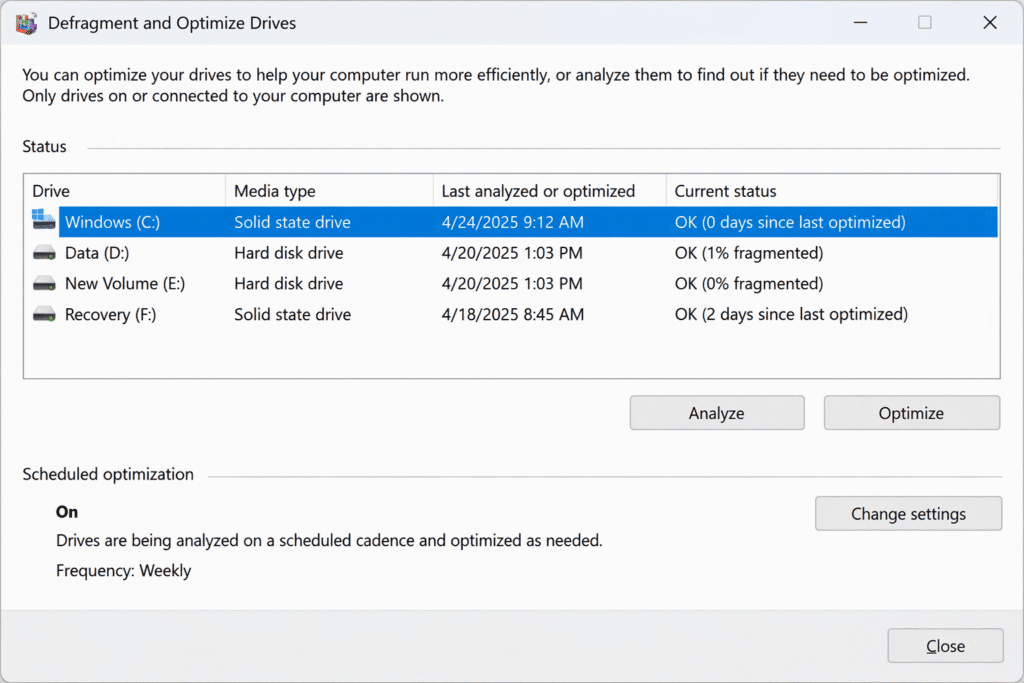
Avoid aggressive third-party defragmentation tools on SSDs. Also, don’t repeatedly optimize drives while investigating unexplained disk saturation. Additional maintenance activity may temporarily increase the workload.
If your computer still uses an older mechanical HDD, consider its performance limitations. Modern SSDs handle random file access much faster. Upgrading can substantially improve boot times and application responsiveness. However, confirm hardware compatibility before purchasing a replacement.
8. Check Hard Drive Health and Detect Possible Hardware Failure
If Windows 11 continues showing 100% disk usage, the storage device itself may be responsible. Software adjustments cannot compensate for serious mechanical damage or failing flash memory. A deteriorating drive may struggle to complete ordinary requests. This can produce extremely high response times despite relatively little data transfer.
Persistent disk saturation becomes more concerning when other warning signs appear. These include repeated freezes, file access errors, unexpected disconnections, and unusual mechanical noises. Windows may also record storage-related errors during these events.
However, no single symptom confirms hardware failure. Faulty cables, controller problems, and unstable power can produce similar behavior. Examine available health information before reaching a final diagnosis.
Check Storage Health in Windows 11
Windows 11 includes storage health monitoring for supported NVMe SSDs. This feature can report reliability warnings and selected drive health indicators. However, Windows does not provide equivalent built-in health monitoring for every SATA SSD or mechanical HDD.
To inspect available information:
- Press Windows + I.
- Navigate to System → Storage.
- Open Advanced storage settings → Disks & volumes.
- Select the relevant physical storage device.
- Open Properties.
- Review available health information and warnings.
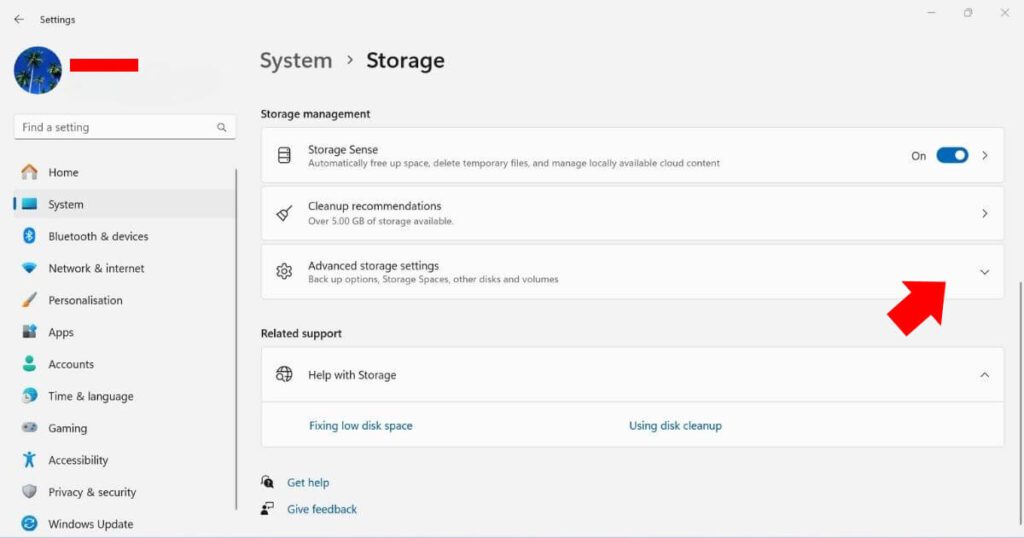
Supported NVMe SSDs may report estimated remaining life, spare capacity, and temperature. However, these indicators cannot predict every failure. A drive can stop working unexpectedly even without exhausting its rated endurance. Microsoft explains supported indicators in its storage health warning documentation.
Use PowerShell to Inspect Physical Disk Health
PowerShell provides another way to inspect reported storage health. This method can identify certain problems without installing additional software. However, available information depends on your storage controller and driver support.
Open PowerShell as Admin and enter:
Get-PhysicalDisk | Select-Object FriendlyName, MediaType, HealthStatus, OperationalStatusThis command lists physical disks visible through Windows storage management. It also displays their reported media types and operational states. Look for warnings or unusual status information.
For additional reliability information, enter:
Get-PhysicalDisk | Get-StorageReliabilityCounterDepending on your hardware, the command may report temperature, errors, wear, and operating information. Some devices provide incomplete results or no useful counters. This limitation does not automatically indicate hardware failure. Microsoft documents these indicators in its PowerShell storage reliability reference.
Recognize SMART Warnings and Hardware Failure Symptoms
Modern HDDs and SSDs generally support Self-Monitoring, Analysis and Reporting Technology (SMART). This technology records internal reliability information that can reveal certain storage problems. However, manufacturers expose different attributes and interpret some measurements differently.
For mechanical HDDs, pay attention to reallocated sectors, pending sectors, and uncorrectable errors. Increasing values may indicate unreliable storage media. SSDs provide different indicators, including wear estimates, spare capacity, and media errors.
Common warning signs include:
- Unusual clicking or grinding noises: Mechanical HDD components may be experiencing physical problems.
- Repeated freezing: Windows may struggle while waiting for storage requests.
- Frequent read/write errors: Applications may fail to access or save files.
- Unexpected disconnections: The drive, connection, or controller may be malfunctioning.
- Increasing response times: Storage requests may take unusually long to finish.
- Repeated disk errors: Windows Event Viewer may record storage timeouts or communication failures.
These symptoms deserve investigation, especially when several appear together. However, hardware failure is not the only possible explanation. Faulty connections and unstable controllers can produce similar errors.
For more accurate diagnostics, use your storage manufacturer’s official testing software. Samsung, Western Digital, Crucial, and Seagate provide diagnostic utilities for selected products. These tools may expose additional health indicators and firmware information.
Know When to Replace Your HDD or SSD
If your drive reports serious health warnings, stop relying on software repairs alone. A failing device cannot regain physical reliability through Windows optimization commands. Continued use may increase the risk of data loss.
Back up important files to another physical device or reliable cloud storage. Prioritize irreplaceable documents, photographs, and business records. Also, verify that you can access the backup files.
If your HDD remains healthy but consistently struggles with modern Windows workloads, consider upgrading to an SSD. SSDs eliminate mechanical seek delays and handle random access more efficiently. This can make Windows considerably more responsive during everyday use.
Before purchasing replacement storage, confirm your computer’s interface and physical installation requirements. Older systems may use SATA connections, while newer computers often support NVMe drives. Review firmware compatibility and migration options before proceeding.
⚠️ Warning: A healthy SMART status doesn’t guarantee complete drive reliability. Some devices fail without advance warnings. Maintain regular backups even when Windows reports normal storage health.
Final Thoughts: Fix 100% Disk Usage Without Reinstalling Windows
Experiencing 100% disk usage in Windows 11 can make even simple tasks frustrating. Fortunately, the problem doesn’t automatically require a Windows reinstall or expensive hardware replacement. Many cases involve manageable background activity, software conflicts, or system maintenance. The key is identifying the bottleneck before making changes.
Start with Task Manager and Resource Monitor to understand which processes consume disk resources. Next, investigate SysMain, Windows Search indexing, and unnecessary startup applications. If the problem continues, examine file system integrity, Windows components, and storage drivers.
Also, review available storage space and confirm Windows maintains your drive appropriately. Remember that storage capacity and disk active time measure different things. Deleting unnecessary files will not repair a defective controller or failing hard drive.
If software troubleshooting fails, examine the physical condition of your storage device. Persistent latency, repeated errors, and reliability warnings may indicate deeper hardware problems. In those cases, protect your data before attempting additional repairs.
Most importantly, change one setting at a time and measure the results. Randomly disabling Windows services can create problems without fixing performance. A systematic approach helps you identify the culprit while preserving system stability.
Did one of these fixes solve your Windows 11 disk usage problem? Tell us which solution worked and whether your computer uses an HDD or SSD. If your disk still reaches 100%, describe the symptoms in the comments. Share this guide with someone struggling with a slow Windows 11 computer!