Artificial intelligence moves faster every single day. Modern organizations now rely on autonomous system agents to handle complex coding, data analysis, and task execution. However, cloud-based tools create massive data privacy risks. Sending proprietary code or confidential client data to third-party endpoints frequently violates compliance policies. Consequently, IT teams require complete data control. You can achieve total privacy by running every model directly on your local silicon.
Building a fully private local agentic workflow changes the game for developers and system administrators. By pairing Ollama with TashiOS, you construct an offline power engine. Ollama handles heavy model orchestration and local LLM execution smoothly. Meanwhile, TashiOS serves as the lightweight operating environment for agent delegation. Together, these open-source tools eliminate subscriptions, prevent external data leaks, and dramatically speed up response times. In this guide, you will learn how to configure this architecture step-by-step.
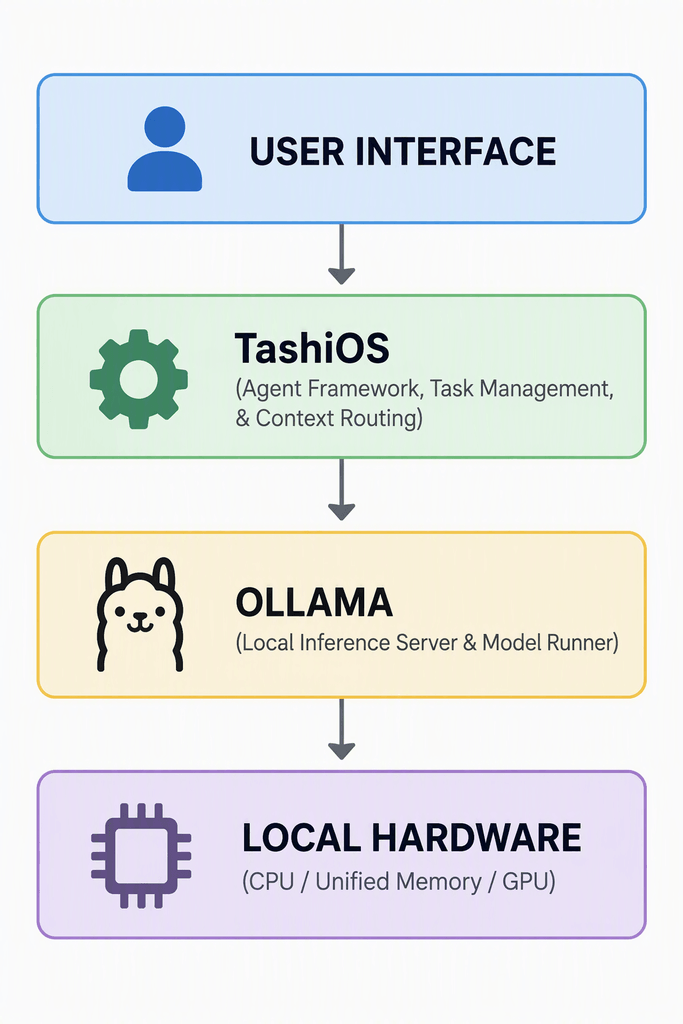
Understanding the Local Stack: Ollama and TashiOS
Before running commands, you must understand how these tools cooperate. Ollama acts as your local model engine. It packages model weights, configurations, and hardware acceleration into clean, manageable routines. Therefore, you can easily run open-source models like Llama 3, Mistral, or Qwen 2.5 on your local machine. Ollama optimizes memory usage automatically, which maximizes performance on consumer GPUs and Apple Silicon chips.
TashiOS complements Ollama by providing the intelligence layer. While Ollama serves the core language model, TashiOS orchestrates task delegation, tool usage, and agent memory. Furthermore, TashiOS structures raw LLM outputs into actionable steps. It allows multiple specialized agents to collaborate seamlessly on complex, multi-stage projects. Consequently, this combination transforms a standard language model into an autonomous, task-oriented workforce.
| System Layer | Core Software | Primary Function | Performance Focus |
| Inference Layer | Ollama Engine | Serves LLM weights & exposes REST APIs | GPU / VRAM Optimization |
| Agentic Framework | TashiOS Architecture | Manages memory, tools, and execution loops | Task Automation Logic |
| Base Infrastructure | Linux / macOS | Provides compute, storage, and networking | Hardware Resource Allocation |
System Requirements and Preparation
To build a smooth self-hosted AI workflow, you must prepare your hardware properly. Agentic systems require more compute resources than standard chat interfaces. Because agents loop through iterative thinking cycles, VRAM and system memory quickly become performance bottlenecks. Thus, verifying your hardware specs upfront saves hours of troubleshooting.
- Processor: Apple Silicon (M1/M2/M3/M4) or x86_64 Intel/AMD CPU with AVX2 support.
- Memory (RAM): 16 GB minimum for 8B models; 32 GB or more recommended for complex agents.
- Graphics (GPU): Dedicated NVIDIA GPU with at least 8 GB VRAM, or Apple Unified Memory.
- Storage: 30 GB of free NVMe SSD space for model weights and cache files.
- Operating System: Ubuntu 22.04 LTS/24.04 LTS, macOS Ventura or newer, or Windows with WSL2.
First, update your operating system packages to ensure system stability. Open your terminal application now. Next, execute your system update command to refresh repository metadata. On Linux systems, run sudo apt update && sudo apt upgrade -y immediately. On macOS, ensure you install Homebrew for effortless package management.
Warning: Running local AI agents on laptops without dedicated active cooling will cause heavy thermal throttling. Monitor your hardware temperatures closely during long loop operations.
Step 1: Installing and Configuring Ollama
Installing Ollama takes only a few simple terminal commands. First, fetch the official installation script directly from the developer source. macOS users can download the native binary installer, while Linux users should run the automated shell script. Execute the following command in your terminal window:
Bash
curl -fsSL https://ollama.com/install.sh | shAfter installation finishes, verify that the Ollama service starts correctly. Test the installation by checking the version number in your console. Type ollama --version into your command prompt. Next, launch your primary base model. For an efficient agentic setup, we recommend Llama 3.2 or Mistral 7B. Pull and run your chosen model using this standard command:
Bash
ollama run llama3.2Ollama will download the model weights automatically. Once the prompt appears, test the output with a simple question. Type /exit to return to your normal terminal command line. Furthermore, you must ensure the Ollama background daemon runs continuously. Configure Ollama to listen on local ports by verifying environment variables. By default, Ollama serves traffic on localhost:11434.
Bash
# Check if Ollama service is active
curl http://localhost:11434/api/tags
Pro-Tip: Set the environment variable OLLAMA_NUM_PARALLEL=4 in your shell profile. This enables Ollama to handle simultaneous requests from multiple TashiOS sub-agents efficiently!
Step 2: Deploying TashiOS for Autonomous Workflows
Now, you will install TashiOS to control your private AI agents. TashiOS requires a modern Python execution environment. Ensure you have installed Python 3.10 or newer before proceeding. First, clone the official TashiOS repository to your local workspace using Git.
Bash
git clone https://github.com/tashios/tashios-core.git
cd tashios-core
Next, isolate your project packages by creating a dedicated Python virtual environment. Virtual environments prevent version conflicts with system-level libraries. Create and activate your environment with these terminal commands:
Bash
python3 -m venv venv
source venv/bin/activate
After activating the environment, install all required dependencies using Python’s package manager. Run pip install -r requirements.txt to install the core libraries. TashiOS will install necessary modules for file handling, context window management, and local API communications.
Next, copy the sample environment configuration file to create your active settings file. Run cp .env.example .env in your directory. Open .env using your favorite text editor, such as Nano or VS Code. Configure the settings to point directly to your local Ollama instance:
Code snippet
# TashiOS Core Configuration
LLM_PROVIDER=ollama
OLLAMA_BASE_URL=http://localhost:11434
DEFAULT_MODEL=llama3.2
ENABLE_LOCAL_TOOLS=true
MAX_AGENT_LOOPS=10
Save the file and exit your editor. You have successfully linked TashiOS to your run LLM locally infrastructure!
Step 3: Constructing Your First Local Agentic Workflow
Now comes the exciting part: configuring your autonomous agents! TashiOS operates using multi-agent roles. Instead of relying on one general model, you assign specific tasks to specialized sub-agents. For instance, you can create a “Researcher” agent and a “Writer” agent.
Create a new workflow configuration file named workflow.yaml inside your project folder. Paste the following structured YAML layout into the file:
YAML
version: "1.0"
workflow_name: "Private Technical Researcher"

agents:
  - name: Research_Agent
    role: "Gathers system metrics and logs."
    model: "llama3.2"
    system_prompt: "You are an expert system administrator. Extract facts precisely."

  - name: Writer_Agent
    role: "Drafts comprehensive technical reports."
    model: "llama3.2"
    system_prompt: "You are a technical editor. Format data into markdown reports."

tasks:
  - id: task_1
    assigned_to: Research_Agent
    input: "Analyze local system disk usage and summary log files."

  - id: task_2
    assigned_to: Writer_Agent
    input: "Summarize findings from task_1 into an executive summary."
    depends_on: task_1
Save this file carefully. Next, execute the agentic loop through the TashiOS command line interface. Run the task runner script to start the processing loop:
Bash
python -m tashios.runner --config workflow.yamlWatch your console output closely! TashiOS initiates the Research_Agent first. The agent queries your local system, formats raw data, and passes context directly to the Writer_Agent. The entire process runs locally on your workstation without sending a single byte over the Internet.
<Sequence>
  <Step title="Initialize Engine" subtitle="Verify Ollama connection">
    Ensure the local API server responds on port 11434 before starting tasks.
  </Step>
  <Step title="Parse Workflow" subtitle="Load YAML configuration">
    TashiOS reads agent definitions, system prompts, and task dependency chains.
  </Step>
  <Step title="Execute Sub-Agents" subtitle="Sequential task processing">
    Agents execute isolated sub-tasks using local LLM inference loops.
  </Step>
  <Step title="Consolidate Outputs" subtitle="Generate final deliverable">
    The orchestration engine merges sub-agent results into your final report.
  </Step>
</Sequence>
Performance Optimization and Best Practices
To maximize speed, you must optimize how context moves through your pipeline. Long prompt histories quickly degrade local model performance. Therefore, limit maximum agent conversation memory inside your TashiOS settings. Set strict context boundaries so the model processes inputs rapidly.
- Quantization Selection: Use 4-bit (K_M) quantized models for speed, or 8-bit models for higher reasoning quality.
- GPU Offloading: Ensure Ollama offloads all model layers directly into VRAM.
- Context Trimming: Enable automatic context trimming within TashiOS configuration to prevent memory saturation.
- Thread Allocation: Match Ollama thread counts with your CPU’s physical core count.
Additionally, choose light base models for low-level orchestration tasks. Smaller models process instruction sets much faster than larger options. Use smaller 3B models for initial filtering, then route complex logic to 8B or 70B models. This tiered approach keeps your private AI agents responsive.
Final Thoughts and Conclusion
Setting up a private TashiOS configuration alongside Ollama guarantees complete operational control. You protect sensitive data, eliminate subscription costs, and build custom workflows tailored to your network. Furthermore, offline functionality means your production automation never drops when external APIs experience outages. Local AI execution represents the future of secure computing.
Take charge of your development environment today by testing this deployment! Have you built custom local agents yet? What hardware are you using to run your setup? Leave your comments, questions, and deployment results below. Share this tutorial with fellow developers and IT pros who value privacy!