This very annoying error has been reported several times from people who upgraded their version of Windows to the latest Windows 10, or to those who upgraded their MS Office to the latest 2013 or 2016 versions.
In most cases, Outlook is able to send and receive emails just fine but the annoying error pops up every now and then. In other cases, Outlook is unable to send and/or receive due to the error.
Other solutions include the following:
- Repairing the MS Office installation through Control Panel
- Downloading and installing MS Windows updates especially the critical updates
- Performing the sfc /scannow command to fix system file integrity issues
- Completely uninstalling MS Office or MS Outlook and then reinstalling
- Disabling Outlook add-ons or add-ins
- Uninstalling the antivirus software
- Repairing the PST file
I have tried the solutions suggested or enumerated above but in my case, the solution was to create a NEW Email Profile but then use the existing PST file (not a NEW PST file) to ensure that all old emails will remain intact.
Here are the detailed procedures:
A. Backup Outlook PST files
If you are still able to open MS Outlook, you can trace the location of your PST files using the following steps:
- Open MS Outlook
- For Outlook 2010, click on File => Account Settings => Account Settings
- In the Account Settings dialog box, click on the Data File tab.
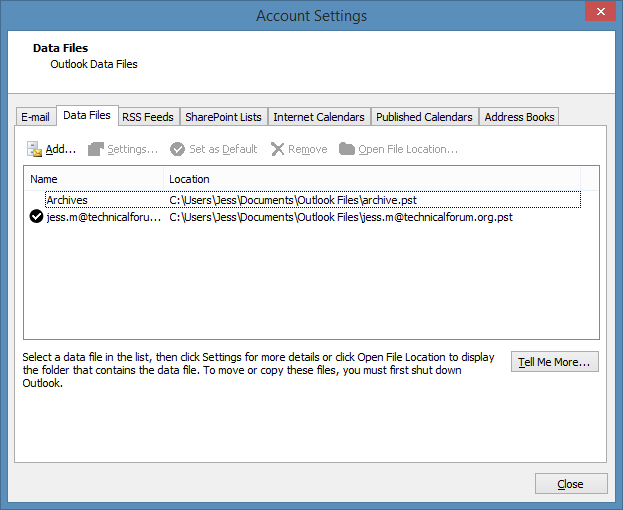
- You should see a list of email accounts (if you have multiple email accounts) along with the location of their respective PST file. Please take mote of those locations.
- Close Account Settings dialog box, and then close Outlook.
- Open an explorer window and then locate the PST file you found in Step #4.
- Manually COPY the PST files into a safe backup location like your Desktop or in a USB Drive.
B. Create a New Email Profile
After saving a backup copy of your PST files, it is now safe to proceed in fixing the problem by creating a new email profile as described below:
- Close your MS Outlook program
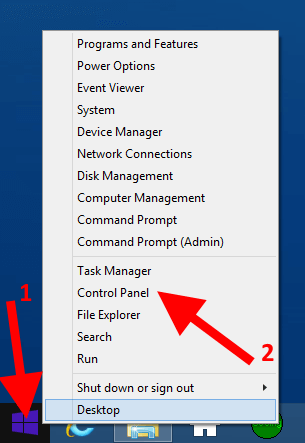
- Open Control Panel. For Windows 8/8.1 and Windows 10 computers, you can right click on the start button (the Microsoft logo on the lower left corner of the screen) and then click on Control Panel.
- In the Control Panel window, please locate Mail (32-bit) or Mail (Outlook 2016) in the list. If you cannot find it, locate the “View by” section at the top, then click on “Category” and then select Small Icons. There you shall see the Mail applet, please open it.
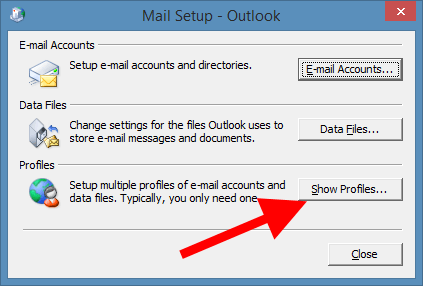
- In the Mail Setup dialog box that opens, click on Show Profiles… button in the Profiles group
- In the Mail dialog box that opens, your profile will be shown there. By default, it is called Outlook.
- Click on the ADD button
- Give your new profile a name, like NEW OUTLOOK
- Click OK
C. Reinstate the Email Account using the Old PST file
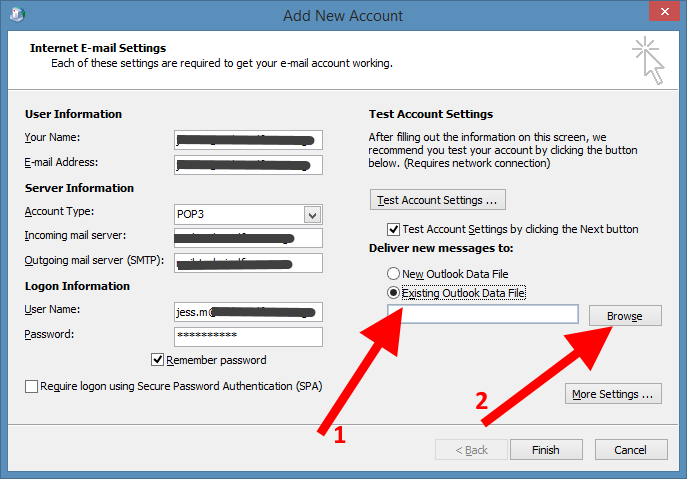
When done with Step #8 above, you will get the Add New Account dialog box. Fill out the needed information, then click on Next. Follow the on screen procedures to setup the old account. If it is setup as IMAP, click the option to manual configure the account and you can then change it to POP or POP3. It is only in this protocol that you can re-use your OLD PST files.
NOTE: If you are using IMAP, and you want to restore the email profile, you do not need to reuse the OLD PST files. The main reason is because the PST files are recreated when IMAP syncs.
After entering the required information about your email account, the most important part here is to set the option “Deliver new messages to” to “Existing Outlook Data File”. Use the Browse button to locate the old PST and select it.
Complete the account setup process and the problem shall be resolved.