
Modern enterprises face relentless credential attacks daily. Traditional passwords no longer offer sufficient protection for corporate assets. Therefore, identity teams must pivot toward strong, phish-resistant authentication. Setting up Windows Hello for Business MFA in Entra ID provides robust security by default. This system links strong asymmetric keys directly to specific hardware devices. As a result, bad actors cannot easily phish or replay user credentials from remote locations.
In this guide, you will learn how to configure this passwordless authentication pipeline. We will cover everything from basic tenant requirements to Intune policy deployments. You will also explore conditional access enforcement to secure your cloud resources.
Understanding Windows Hello as a Standalone MFA Factor
Many IT administrators mistakenly view Windows Hello as a basic password replacement. However, the underlying architecture actually fulfills true multi-factor requirements natively.
The Core Authentication Architecture
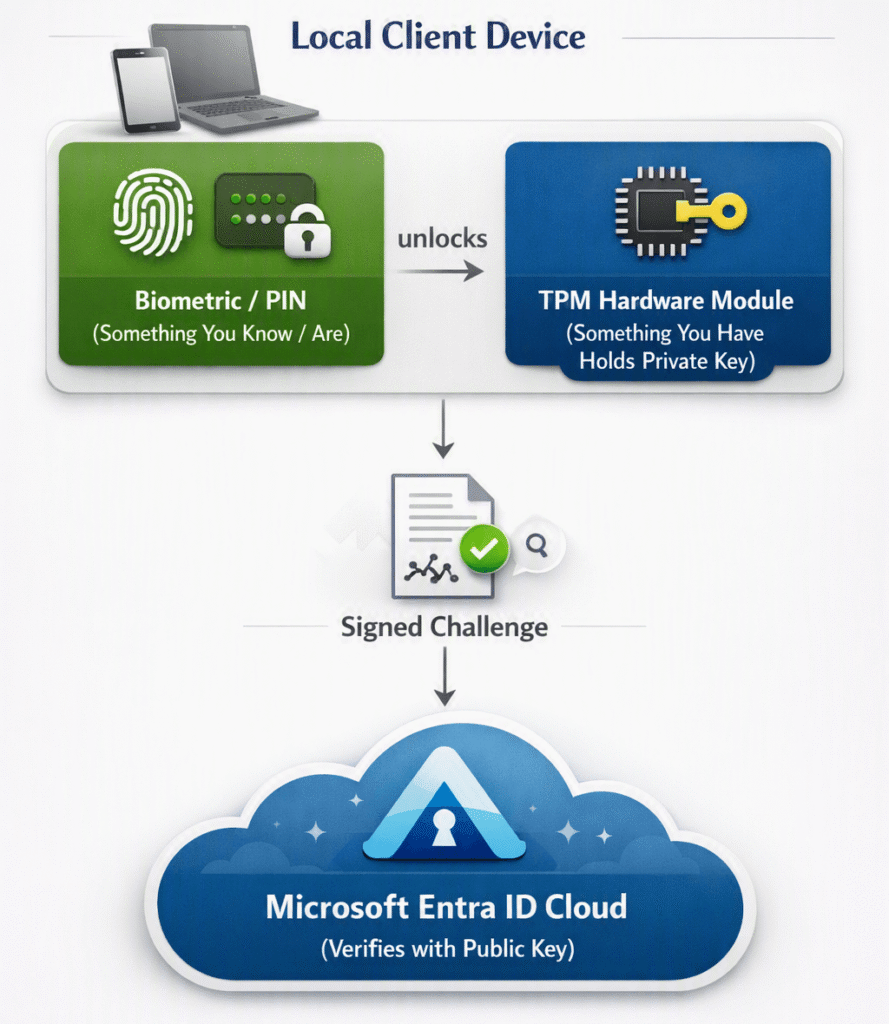
Windows Hello for Business binds a cryptographically generated private key directly to the physical device hardware. The system usually stores this key inside a dedicated Trusted Platform Module (TPM) chip. When a user signs in, they present two distinct factors simultaneously:
- Something You Have: The physical device housing the isolated hardware private key.
- Something You Know / Are: A local PIN code or a local biometric gesture like facial recognition.
Because the biometric data and PIN never leave the local machine, attackers cannot steal them across the network. The remote identity provider receives only a digital signature verified by the corresponding public key. Thus, Windows Hello serves as a phish-resistant standalone MFA factor.
Key Enterprise Advantages
Deploying this mechanism yields several key administrative benefits:
- Elimination of Password Spray Attacks: Users rely on local gestures instead of reusable domain secrets.
- Reduced Helpdesk Overhead: Self-service PIN resets lower operational support tickets dramatically.
- Compliance Readiness: Meets strict Zero Trust mandates by enforcing hardware-bound credentials.
Step 1: Verify System Prerequisites
Before changing tenant configurations, ensure your infrastructure meets Microsoft’s baseline standard. Skipping these checks will cause enrolment errors during provisioning.
- Licensing Requirements: Ensure users hold Entra ID P1 or P2 licenses.
- Device Enrolment: Devices must be Microsoft Entra Joined or Entra Hybrid Joined.
- Hardware Module: Client machines should contain TPM 2.0 chips for maximum security.
- OS Version: Clients must run Windows 10 (version 1709 or later) or Windows 11.
💡 Pro-Tip: Check TPM health centrally using Microsoft Intune or custom PowerShell scripts before rolling out policies tenant-wide. Older machines with TPM 1.2 might work, but TPM 2.0 provides far better hardware isolation.
Step 2: Configure Tenant-Wide Authentication Methods
Next, you must enable the passwordless credentials within your Entra ID tenant. You can manage these settings directly inside the Microsoft Entra Admin Center.
Microsoft Entra Admin Center
  └── Protection
       └── Authentication methods
            ├── Policies (Enable FIDO2 / Windows Hello)
            └── Registration campaign
- Navigate to the Microsoft Entra Admin Center.
- Expand the Protection tab on the left menu, then select Authentication methods.
- Click on Policies.
- Locate FIDO2 security keys and Microsoft Authenticator to ensure proper modern auth enablement.
- Ensure target user groups possess rights to register strong authentication credentials.
Step 3: Deploy Policy Settings via Microsoft Intune
While Entra ID handles user identity, Microsoft Intune manages device-level policy enforcement. You should deploy Windows Hello configurations through Intune Account Protection profiles for optimal control.
Microsoft Intune Admin Center
  └── Endpoint security
       └── Account protection
            └── Create Policy (Windows 10 and later -> Account protection)
- Open the Microsoft Intune Admin Center.
- Select Endpoint security, then click Account protection.
- Select Create Policy.
- Set the platform to Windows 10 and later. Select Account protection as the profile type.
- Click Create and give your policy a descriptive name, such as
WIN-Hello-MFA-Policy. - Configure the underlying settings according to your organization’s risk profile:
| Policy Configuration Setting | Recommended Enterprise Value | Security Rationale |
| Enable Windows Hello for Business | Enabled | Enforces the initial registration prompt for enrolled users. |
| Minimum PIN Length | 6 or 8 Characters | Prevents trivial PIN guessing attempts. |
| Enable Biometrics | Allowed | Permits fingerprint and facial recognition unlock. |
| Use Security Key for Sign-in | Enabled | Allows fallback to physical security keys. |
| Use TPM for Hardware Protection | Required | Ensures private keys stay inside isolated hardware. |
- Assign this profile to a targeted Entra ID Security Group containing test users.
⚠️ Warning: Avoid enabling Windows Hello globally across the entire tenant at enrollment time via tenant-wide settings. Conflicts between enrollment policies and custom Intune profiles can cause deployment loops.
Step 4: Enforce MFA via Conditional Access Policies
After deploying the hardware policy, you must require strong authentication through Conditional Access. This step blocks weak legacy options while accepting Windows Hello as a valid MFA factor.
Microsoft Entra Admin Center
  └── Protection
       └── Conditional Access
            └── Policies -> New Policy
                 ├── Target Users: Pilot Group
                 ├── Cloud Apps: All Cloud Apps
                 └── Grant: Require Authentication Strength (Passwordless MFA)
- Navigate back to Microsoft Entra Admin Center.
- Go to Protection > Conditional Access.
- Click New policy.
- Name your policy
CA-Enforce-Passwordless-MFA. - Under Assignments, select your pilot user group.
- Under Target resources, choose All cloud apps.
- Under Access controls, select Grant.
- Choose Require authentication strength, then pick Passwordless MFA.
- Enable the policy in Report-only mode first to monitor impact, then switch it to On.
Step 5: User Onboarding and Verification
Once policies sync, end users will experience a streamlined enrollment process during their next logon.
- The user logs into Windows using their temporary access pass or existing corporate password.
- Windows displays a mandatory prompt: “Your organization requires Windows Hello for Business.”
- The system initiates an Entra ID MFA check to establish identity trust.
- The user completes the local biometric scan or sets a compliant PIN.
- Windows stores the generated private key in the hardware TPM.
To verify successful registration on the client machine, open an elevated Command Prompt and run:
DOS
dsregcmd /statusLook for the following entries under Device Auth Status:
NgcSet : YES
NgcKeySignHasSubmitted : YES
If both parameters display YES, the client successfully registered its Windows Hello credentials to Entra ID.
Troubleshooting Common Deployment Issues
Rollouts occasionally hit minor roadblocks. Use this troubleshooting matrix to resolve common configuration issues quickly.
- Error Code
0x80090011(Container Not Found): This error typically occurs when TPM ownership is invalid. Clear the TPM via the local BIOS settings or re-register the device. - PIN Provisioning Prompt Fails to Launch: Check your Intune policy assignments. Ensure the targeted user actually holds an active Entra ID P1 license.
- MFA Loop During Onboarding: Verify that your Conditional Access policy excludes the initial provisioning state. Use a Temporary Access Pass (TAP) for smooth first-time registration.
Final Thoughts
Implementing Windows Hello for Business MFA in Entra ID dramatically improves your security posture. You remove weak passwords while simplifying daily sign-in routines for users. Start with a targeted pilot group today, test your policies, and accelerate your journey toward a true passwordless enterprise!
Did you find this guide helpful? Drop your thoughts, questions, or deployment experiences in the comments section below! Don’t forget to share this post with fellow sysadmins on social media!