Privacy-conscious power users often struggle to maintain a seamless, encrypted local Obsidian vault without paying for cloud subscriptions. Fortunately, you can build a robust, zero-trust knowledge base using reliable open-source tools. Standard cloud storage providers scan user files and charge recurring fees for basic sync features. Meanwhile, Obsidian Sync costs money and locks your database into a proprietary ecosystem. By taking control of your sync pipeline, you guarantee complete privacy across every single device.
This comprehensive guide walks you through setting up an end-to-end encrypted note system using Syncthing and Cryptomator. You will learn how to synchronize your local markdown files securely across Windows, macOS, Linux, and Android. By eliminating middleman servers, you retain absolute ownership over your valuable notes and personal data. Let us dive right into building your private, subscription-free second brain.
Understanding the Architecture: Security Meets Local Control
Building a private note-taking environment requires a solid understanding of how local synchronization works alongside file encryption. Most users rely on mainstream services like Google Drive or Microsoft OneDrive for convenience. However, these platforms index your documents and leave sensitive technical notes exposed to potential data breaches. An encrypted local Obsidian vault solves this vulnerability by encrypting files before they ever touch a network interface.
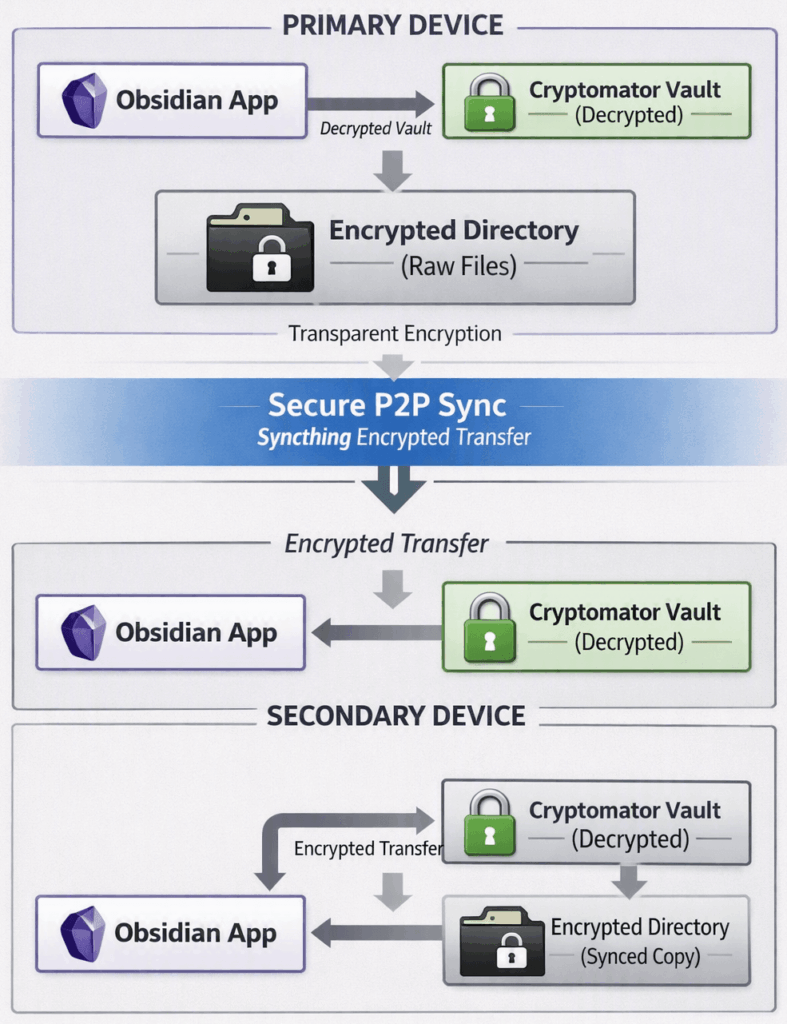
Our recommended architecture relies on two powerful, community-vetted tools working together seamlessly. First, Cryptomator handles client-side encryption by turning your standard local directory into a locked vault. Next, Syncthing manages real-time continuous sync between your physical devices using peer-to-peer protocols. Consequently, your raw markdown files never exist in plain text outside your trusted physical hardware.
Why Choose Local Obsidian Sync Over Cloud Alternatives?
Local synchronization completely eliminates recurring monthly costs while granting total sovereignty over your data structure. Cloud platforms can change terms of service, suffer outages, or suffer security breaches without warning. Conversely, local syncing operates inside your personal local area network without external dependencies. Your encrypted local Obsidian vault stays completely operational even during total internet blackouts.
Additionally, local syncing delivers significantly faster transfer speeds when moving large media attachments between computers. Direct local network transfers move files at full Wi-Fi speeds rather than relying on ISP upload limits. Furthermore, you eliminate file size caps and restrictive API rate limits entirely.
Step 1: Setting Up Client-Side Encryption with Cryptomator
To secure your sensitive information, you must first establish an unbreakable encryption layer around your storage directory. Download and install the open-source client directly from the official Cryptomator download page. Cryptomator encrypts both file contents and directory names using AES-256 bits keys transparently.
Launch the application and select the option to create a brand-new vault on your primary computer. Choose a memorable, secure location on your local drive to store the raw encrypted vault files. Afterward, define a strong passphrase that you will never forget under any circumstances. Cryptomator will then mount this vault as a virtual drive letter or directory on your system.
Pro-Tip: Always copy and store your Cryptomator recovery key in an offline password manager likeKeePassXC. If you forget your primary passphrase, this recovery key remains your only method to recover encrypted notes.
Step 2: Creating and Configuring Your Obsidian Vault
Once Cryptomator mounts your unlocked virtual drive, open your installed copy of Obsidian. Select the option to create a new vault and set its location inside the newly mounted virtual drive. This step ensures that Obsidian writes plain text markdown files directly into Cryptomator’s transparent encryption layer.
Configure your community plugins, custom hotkeys, and aesthetic themes inside this mounted drive as usual. Because Obsidian reads the unlocked drive normally, all core features work without performance degradation. However, behind the scenes, Cryptomator immediately converts every saved change into scrambled ciphertext on your physical disk.
[ Unlocked Virtual Drive ]  ---> Writes Plaintext (.md) ---> [ Cryptomator Engine ]
                                                                     |
                                                           (AES-256 Encryption)
                                                                     v
[ Physical Disk Storage ]  <--- Saves Encrypted Blocks <--- [ Raw Vault Folder ]
Essential Obsidian Internal Settings
To minimize file conflict issues during continuous synchronization, adjust a few default Obsidian preferences immediately:
- Open Settings -> Files and links.
- Turn on Auto convert HTML.
- Set Default location for new attachments to a specific subfolder (e.g.,
attachments). - Disable Automatically update internal links if you frequently edit large note batches offline.
Step 3: Configuring Continuous Sync with Syncthing
With encryption properly configured, you must now transport these encrypted blocks across your various working devices. Download the appropriate continuous file synchronization utility from the official Syncthing release portal. Syncthing replaces centralized cloud services by connecting your devices directly using encrypted P2P connections.
Install Syncthing on your primary workstation and your target secondary device (such as a laptop or Android tablet). Open the Web GUI interface by navigating to localhost:8384 inside your preferred web browser. Click Add Remote Device on your primary machine and enter the unique Device ID generated by your target device.
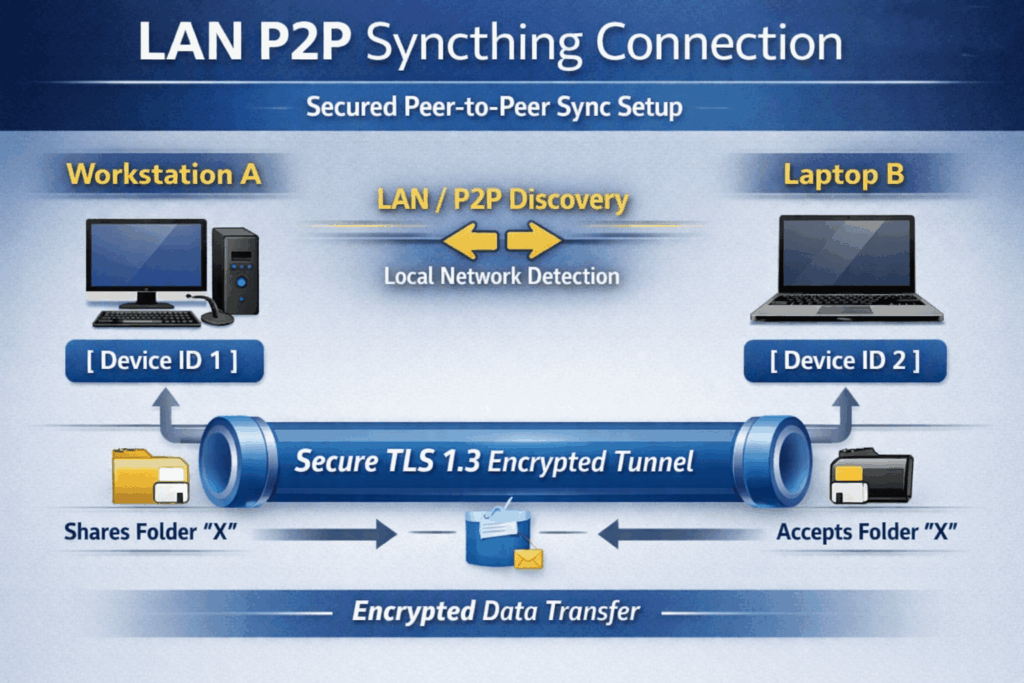
Next, add the local directory containing your raw, encrypted Cryptomator vault files to Syncthing as a shared folder. Do not share the unlocked virtual drive; share only the encrypted underlying directory structure. Share this folder with your target device and accept the incoming folder request on the receiving node.
Warning: Never attempt to sync the unlocked Cryptomator virtual drive directly over Syncthing. Syncing virtual virtual filesystem mounts causes severe file corruption, lockup errors, and catastrophic data loss!
Step 4: Connecting Android and iOS Mobile Devices
Extending your local Obsidian sync pipeline to mobile devices requires specific strategies depending on your mobile operating system. On Android devices, you can install the official Syncthing application directly from the F-Droid store or Google Play. Configure the mobile application to receive the raw encrypted vault folder from your desktop computer.
Afterward, install Cryptomator for Android to decrypt your notes directly on your mobile device. Open Cryptomator, select Open Existing Vault, and navigate to the synced folder location on your internal storage. Once unlocked, point the mobile Obsidian application to the decrypted directory to access your complete vault on the go.
+-----------------------------------------------------------------+
|                         ANDROID DEVICE                          |
|                                                                 |
|  [ Syncthing App ] ---> Receives Encrypted Blocks over Wi-Fi    |
|                                   |                             |
|                                   v                             |
|  [ Local Storage ] ---> Holds Raw Encrypted Vault Folder        |
|                                   |                             |
|                                   v                             |
|  [ Cryptomator ]   ---> Unlocks Vault to Virtual Directory    |
|                                   |                             |
|                                   v                             |
|  [ Obsidian Mobile]---> Reads Decrypted Markdown Notes          |
+-----------------------------------------------------------------+
Managing Mobile Platform Limitations
Apple iOS enforces strict sandbox restrictions that prevent background utilities like Syncthing from accessing file system directories freely. Therefore, iOS users must adapt their cross-platform note syncing approach slightly to maintain local control:
- Use Working Copy (a powerful Git client) to sync notes over encrypted private Git repositories.
- Use Remotely Save, a popular Obsidian community plugin supporting custom WebDAV or S3 backends.
- Utilize local Samba (SMB) shares within your home network for manual local backups.
Resolving Sync Conflicts and Performance Optimization
Even the best open-source file sync systems encounter file version conflicts when editing notes simultaneously across multiple hardware devices. Fortunately, Syncthing handles conflicts gracefully by creating distinct conflict files whenever simultaneous edits occur. You can easily locate these instances by searching your vault for filenames containing the .syncthing-tmp extension.
To keep your cross-platform note syncing fast and reliable, avoid editing the exact same note concurrently on two active screens. Furthermore, ensure that Syncthing finishes its initial delta index scan before opening Obsidian on your secondary computer. These basic operational habits prevent duplicate file creation and keep your database perfectly clean.
| Sync Method | End-to-End Encryption | Zero Subscription Cost | Full Data Sovereignty | Setup Complexity |
| Obsidian Sync (Official) | Yes | No ($4-$8/mo) | Partial (Hosted) | Very Low |
| Standard Cloud Storage | No (Usually) | Partial (Freemium) | No | Low |
| Syncthing + Cryptomator | Yes (AES-256) | Yes (100% Free) | Yes (100% Local) | Moderate |
Maintaining and Backing Up Your Encrypted Vault
Building a local sync system completely removes reliance on corporate cloud providers, but it shifts maintenance responsibility to you. Consequently, establishing an automated offline backup schedule represents a mandatory safeguard for your digital knowledge base. A single hardware failure or filesystem corruption event could permanently destroy years of unbacked research.
Follow the trusted 3-2-1 backup strategy to secure your data against hardware failures and software issues:
- Maintain 3 copies of your data (your primary computer, secondary sync node, and an isolated backup).
- Store backups on 2 different storage media types (e.g., internal NVMe SSD and external USB drive).
- Keep 1 backup copy stored off-site or on an encrypted air-gapped storage drive.
Final Thoughts
Setting up an encrypted local Obsidian vault synced across devices without cloud subscriptions grants you absolute data privacy. By combining Cryptomator’s powerful encryption engine with Syncthing’s fast peer-to-peer transport protocol, you build a fully sovereign knowledge base. You no longer need to worry about recurring monthly fees, central cloud breaches, or invasive corporate telemetry.
Taking control of your digital infrastructure takes initial effort, but the long-term security benefits are massive. Your personal ideas, private journals, and technical documentation stay strictly under your personal control. Start configuring your private sync pipeline today to experience true digital independence!
What local sync setup do you currently use for your private notes? Let us know your thoughts, questions, or custom configurations in the comments below! If you found this guide helpful, please share it with fellow privacy enthusiasts on social media.