
I encountered this weird problem when connecting to wireless networks that I felt the need to share the solution as this might help other people as well. The scenario is that, when I turn on my wireless radio, my Lenovo laptop is able to locate available wireless networks. However, when I will connect to ANY of the wireless network in the list, Windows will return an error.
I am using Windows 7 but logically, the solution will still work on other versions of Windows like Vista and 8.
The Problem
I normally use wired connection at home and work and I usually utilize my wireless card in broadcasting wifi using Connectify. Thus, I don’t usually use my wifi to connect to wireless networks.
I was out for a vacation and needed to connect to a public hotspot. When I turned on my wireless radio, Windows then displayed the various wireless networks within the range. However, any attempt to connect to a password-protected and to the non-protected networks, it will always give an error.
Initial Solution
My immediate solution was to use the built-in Troubleshooter. It saved me a lot of time in the past. In fact, many of the Windows problems can be resolved using the troubleshooter. Here are the steps:
- Click Start => Control Panel
- Open Troubleshooting
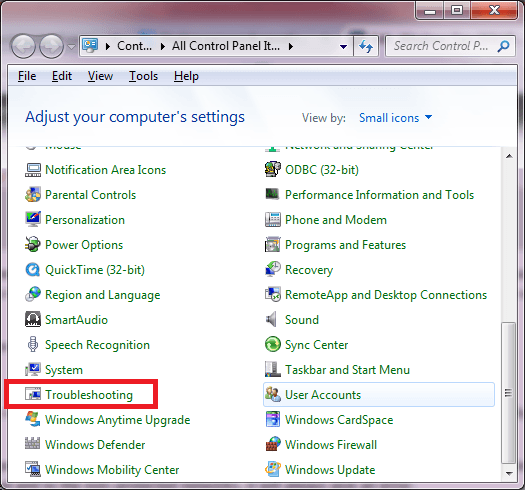
- In the next window that opens, click on Connect to the Internet under Network and Internet
- Then follow the on screen procedures to resolve the problems automatically.
Most of the common problems can be corrected using the process above, not just with the internet connection since the troubleshooter wizard also have various options for troubleshooting.
Another procedures that I tried was uninstalling my wireless drivers and then restarting the computer. During the restart, Windows automatically reloaded the wireless drivers. But still no luck. Wireless drivers are intact and running with no issue, but still cannot connect to any wireless networks.
The Source of The Problem
In my case, the procedures that worked involved some tricky investigation. Here are the steps I tried:
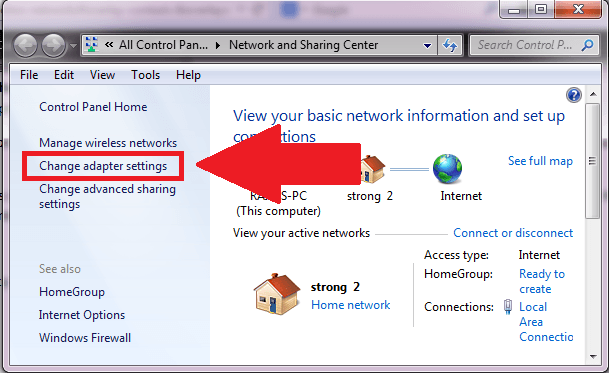
- Go to Control Panel
- Open Network and Sharing Center
- Click on Change Adapter Settings in the left panel
- Locate your wireless network connection that is using your wireless network card, not the one with the Microsoft Virtual Wifi.
- Right click on it, then click Properties.
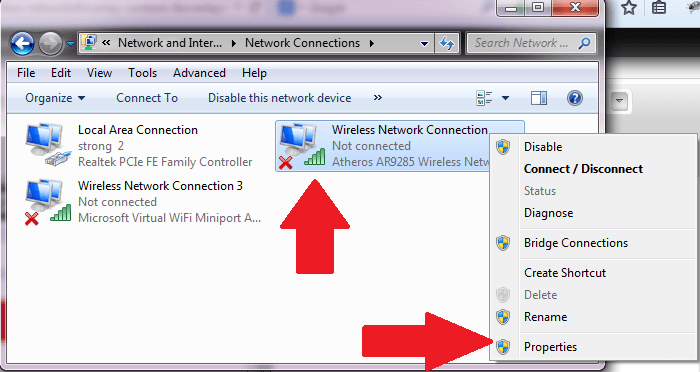
- In the dialog box that opens, click on Configure button.
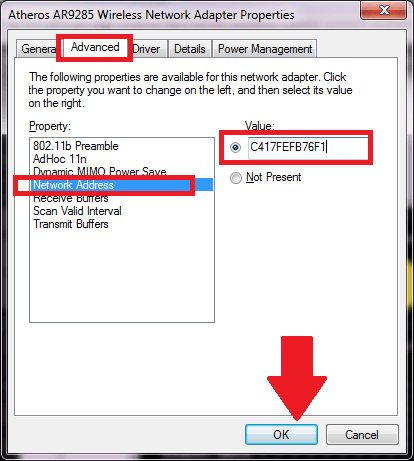
- Click on the Advanced tab and click on Network Address in the Property box.
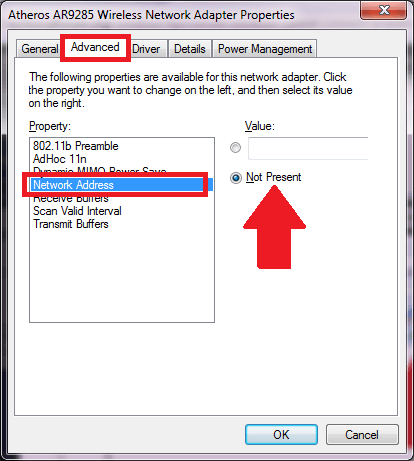
- This is the source of the problem, Network Address is set as Not Present. Originally, this value box contains the MAC address of the wireless card. But once “Not present” is selected, the entry in the Value box is gone.
The Solution that Worked (for Me)
The main part of the solution is to put the correct Network Address in the image in step 7. The process involves using the command prompt to locate the exact MAC address of the wireless network card, which in my case, as the screen shot shows, is Atheros AR9285 Wireless Network Adapter.
To get the exact network address of your wireless adapter, do the following:
- Open the command prompt by clicking Start and then typing CMD in the search box. Alternately, you can click Start => All Programs => Accessories => Command Prompt.
- In the black command prompt window, type this command and then press Enter.
ipconfig /all
- After pressing Enter, locate in the results displayed for the entry that refers or points to your wireless adapter. In my case, it is Atheros AR9285 Wireless Network Adapter, and the results show exactly that.
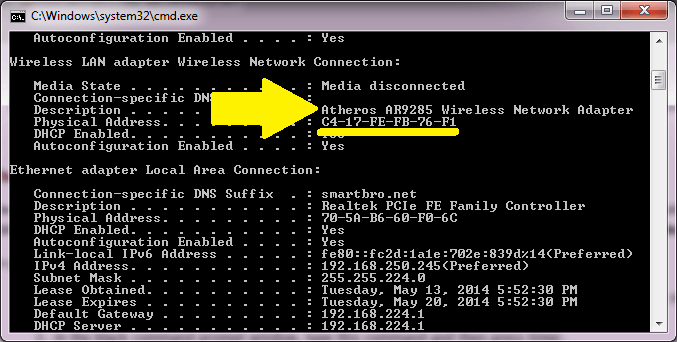
- Based on the screen shot above, the network address of my wireless card is C4-17-FE-FB-76-F1. That is exactly what I need to enter in the Network Address Value box in the step 7 above, but, without the dashes (C417FEFB76F1).
- When the network address is known, go to your wireless networks again, right click on the Wireless Network Connection showing your wireless card (not the Microsoft Virtual Wifi), then click on Properties. Then click Configure, then click on Advanced tab and click Network Address.
- In the value box, enter the Physical Address that you got, without the dashes. My screen is shown below.
After clicking OK, restart your computer for the changes to take effect. This time, you shall be able to connect to the wireless network within your wifi range!
💬 Conclusion: Join the Conversation
Have you encountered similar wireless connectivity issues on your Windows device? Share your experiences, solutions, or questions in the comments below. Your insights could assist others facing the same challenges!