Accidentally deleted important files? Don’t panic just yet. Whether it’s a USB stick or a hard drive, file loss can often be reversed. In many cases, the files are still recoverable unless they’ve been overwritten. The key is to act quickly and avoid saving new data on the affected device.
In this article, we’ll show you how to recover deleted files and restore lost data using reliable methods. You’ll also learn how recovery works, when it fails, and how to boost your chances of success without needing advanced tech skills.
1. Check the Recycle Bin or Trash First
Before using any tools, always check the Recycle Bin (Windows) or Trash (Mac). Deleted files often stay there temporarily.
To check:
- Double-click the Recycle Bin icon on your desktop
- Locate the deleted file
- Right-click and choose Restore

This simple step can save you time. If the file isn’t there, it may have been permanently deleted or emptied recently. For Mac users, check the Apple Trash recovery guide.
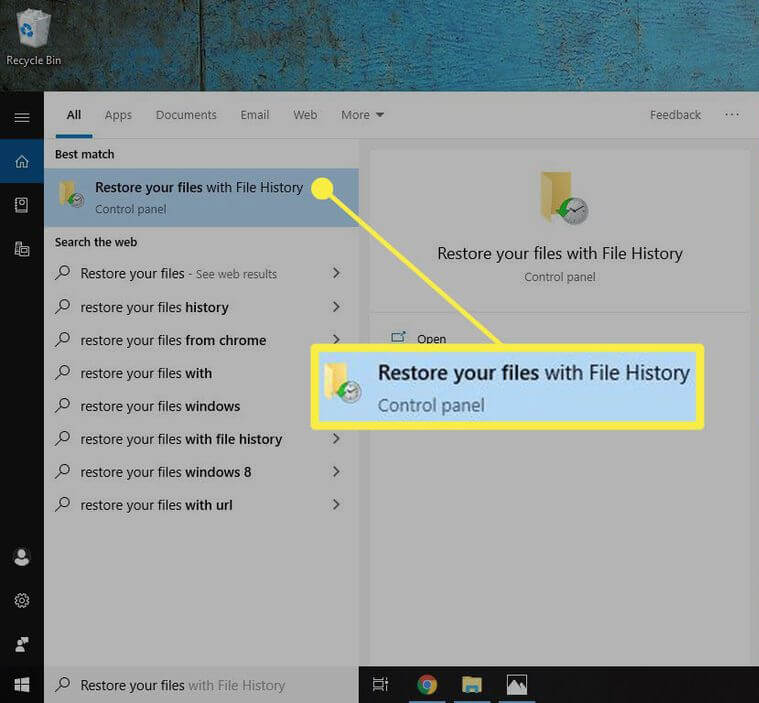
2. Use File History or System Restore (Windows)
Windows offers built-in recovery features like File History and System Restore for accidental deletion.
To use File History:
- Go to Control Panel > System and Security > File History
- Click Restore personal files
- Browse to find your lost file
You can also try System Restore to revert system files to a previous state. However, it won’t recover personal files like documents or images.
3. Recover Files from USB or External Drives Using Command Prompt
You can use Command Prompt to try file recovery on USBs or hard drives.
Steps:
- Connect the drive to your PC
- Press Windows + R, type
cmd, and run as administrator - Enter this command:
chkdsk E: /f(replace E: with your drive letter) - Then enter:
attrib -h -r -s /s /d E:\*.*
This method helps if the files were hidden due to drive corruption. For more, see Microsoft’s command-line reference.
4. Try Free File Recovery Tools
If the Recycle Bin or File History doesn’t help, file recovery software is your best bet.
Popular free tools include:
- Recuva: Lightweight and user-friendly
- PhotoRec: Powerful but text-based
- EaseUS Data Recovery: Offers a free tier for limited data
These programs scan your drive for recoverable data and let you preview before restoring. Always install recovery tools on a different drive to avoid overwriting lost data.
5. Mac Users Can Use Time Machine or Third-Party Apps
Mac users have Time Machine, which backs up files automatically if enabled.
To restore from Time Machine:
- Open the folder where the deleted file was located
- Launch Time Machine from the menu bar
- Browse previous versions and restore the needed file
If Time Machine isn’t available, apps like Disk Drill for Mac or Stellar Data Recovery can help. Both support USB, SD cards, and external drives.
6. Prevent Future File Loss with Smart Habits
Once you recover your data, take steps to prevent this in the future.
Tips include:
- Enable automatic backups with File History or Time Machine
- Save important files to cloud storage like Google Drive or OneDrive
- Use a reliable antivirus to protect against malware or ransomware
- Always double-check before emptying the Recycle Bin
Smart backup practices and regular file audits can save you from panic and loss down the road.
Final Thoughts
Losing files is stressful, but recovery is possible if you act fast. Whether you use built-in tools or recovery software, you have options.
Have a recovery success story or a question? Share it in the comments below—we’d love to hear from you!