
When you are using MS Outlook of any version (2003, 2007, 2010, etc.), it is a common experience that when you send an email, a copy of the sent email is saved in the Sent Items folder. This is the default behavior.
What if you want Outlook to move it to your Inbox folder so that you can keep an eye on the progress of your communication?
If you are using MS Outlook in a business setup, you might want to place the sent email to your Inbox. For what reason? So that you can keep an eye on your communication and so that you can mark the email for follow up on a specified date. This article will show you how to do just that.
The procedures that follow will show you how to setup a RULE in MS Outlook (I’m using Outlook 2010 for the screen shot) which will do the following:
- Move the sent email to the Inbox folder instead of moving it to Sent Items folder
- Allow marking or flagging of the sent email in the Inbox for follow up in a specified date
Moving Sent Emails to Inbox Automatically
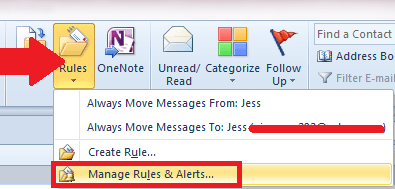
Step 1: Open your MS Outlook. Click on the Home tab. In the Move group, click on Rules then click on Manage Rules & Alerts
Step 2: Then click on the New Rule… button to create a new rule.
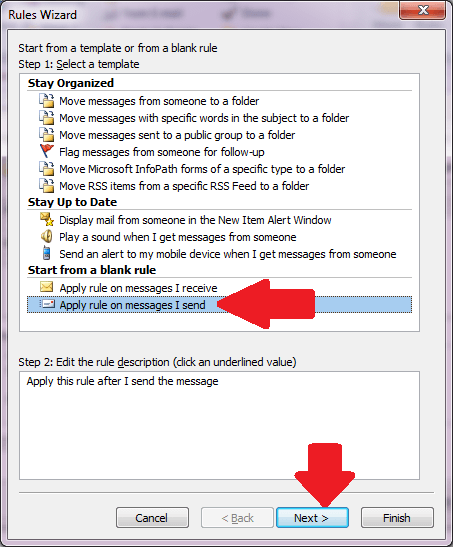
Step 3: In the Rules Wizard, on the bottom group called Start from a blank rule, click to select “Apply rule on messages I send”. Then click Next button.
Step 4: In the next screen, click to select the option “through the specified account”. Then you will notice that in the box at the bottom part, the selected option is reflected. Click on the “specified” link in that bottom box and then pick the email account that you will be using. This is important if you have multiple emails in your Outlook. You have the option to only apply the rule to a selected account. Bypassing this step will cause the rule to affect all sent emails sent using any of your accounts.
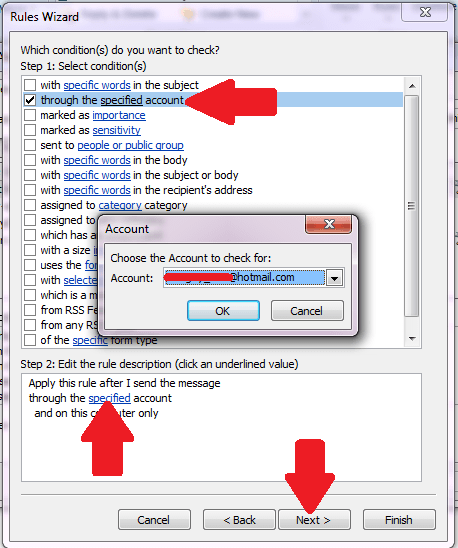
Step 5: After selecting the account, click on Next.
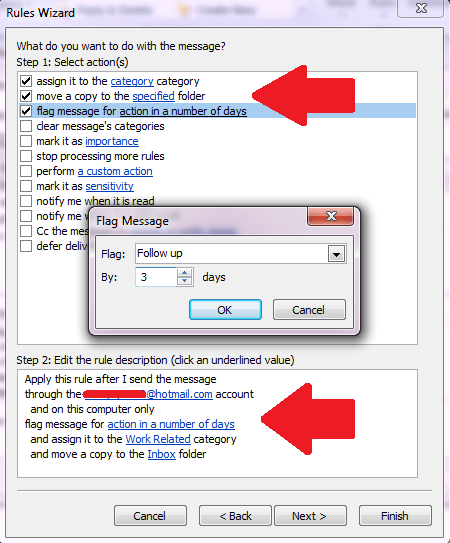
Step 6: In the next screen you have several options that you can consider depending on your preference. But here, you can (1) assign the sent email to a category, (2) move a copy to the specified folder (Inbox in this case) and (3) flag message for action in a number of days. After having those selection, click on the “category” link at the bottom and then pick your Category. Then click on “specified” link and then choose Inbox. Lastly, click on action in a number of days link and you can choose “Flag” and then input your desired number of days that the message will be flagged.
Step 7: After making those selection, click Next. In the next screen, you can provide exceptions. For the purpose of this demo, click on Next without any selection made.
Step 8: Give your rule a descriptive name like Move To Inbox. Make sure that the check box “Turn on this rule” is checked.
Step 9: Click Finish.
Step 10: Congratulations! The next time you send an email in your Outlook, the sent email will be moved to your Inbox folder, categorized and flagged for follow up.