You can easily save your existing MS Outlook contacts or address book by exporting them into a CSV file. This process is documented in my previous article. However, even if the contacts are not coming from MS Outlook 2010, you can still use them in your MS Outlook 2010 software.
For instance, you have an older version of MS Outlook like 2003 or 2010, you can still use this saved address book file with your MS Outlook 2010 provided that the exported file meets the CSV requirement of MS Outlook.
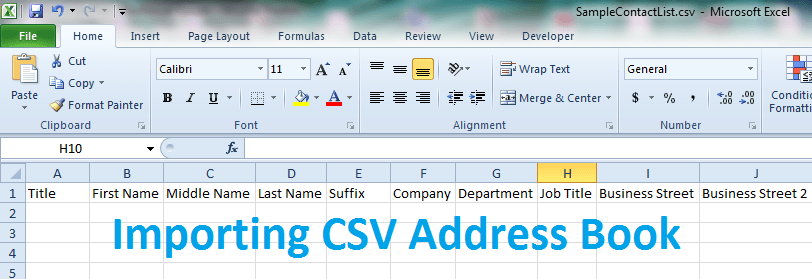
If the CSV file was created by a previous version of MS Outlook during exporting your address book, you can readily use this CSV file. However, if the CSV file was created manually or by other email program, you need to see to it that the columns are compatible with the existing Outlook data structure listed below:
| Outlook CSV Columns | |
| 1.) | Title |
| 2.) | First Name |
| 3.) | Middle Name |
| 4.) | Last Name |
| 5.) | Suffix |
| 6.) | Company |
| 7.) | Department |
| 8.) | Job Title |
| 9.) | Business Street |
| 10.) | Business Street 2 |
| 11.) | Business Street 3 |
| 12.) | Business City |
| 13.) | Business State |
| 14.) | Business Postal Code |
| 15.) | Business Country/Region |
| 16.) | Home Street |
| 17.) | Home Street 2 |
| 18.) | Home Street 3 |
| 19.) | Home City |
| 20.) | Home State |
| 21.) | Home Postal Code |
| 22.) | Home Country/Region |
| 23.) | Other Street |
| 24.) | Other Street 2 |
| 25.) | Other Street 3 |
| 26.) | Other City |
| 27.) | Other State |
| 28.) | Other Postal Code |
| 29.) | Other Country/Region |
| 30.) | Assistant’s Phone |
| 31.) | Business Fax |
| 32.) | Business Phone |
| 33.) | Business Phone 2 |
| 34.) | Callback |
| 35.) | Car Phone |
| 36.) | Company Main Phone |
| 37.) | Home Fax |
| 38.) | Home Phone |
| 39.) | Home Phone 2 |
| 40.) | ISDN |
| 41.) | Mobile Phone |
| 42.) | Other Fax |
| 43.) | Other Phone |
| 44.) | Pager |
| 45.) | Primary Phone |
| 46.) | Radio Phone |
| 47.) | TTY/TDD Phone |
| 48.) | Telex |
| 49.) | Account |
| 50.) | Anniversary |
| 51.) | Assistant’s Name |
| 52.) | Billing Information |
| 53.) | Birthday |
| 54.) | Business Address PO Box |
| 55.) | Categories |
| 56.) | Children |
| 57.) | Directory Server |
| 58.) | E-mail Address |
| 59.) | E-mail Type |
| 60.) | E-mail Display Name |
| 61.) | E-mail 2 Address |
| 62.) | E-mail 2 Type |
| 63.) | E-mail 2 Display Name |
| 64.) | E-mail 3 Address |
| 65.) | E-mail 3 Type |
| 66.) | E-mail 3 Display Name |
| 67.) | Gender |
| 68.) | Government ID Number |
| 69.) | Hobby |
| 70.) | Home Address PO Box |
| 71.) | Initials |
| 72.) | Internet Free Busy |
| 73.) | Keywords |
| 74.) | Language |
| 75.) | Location |
| 76.) | Manager’s Name |
| 77.) | Mileage |
| 78.) | Notes |
| 79.) | Office Location |
| 80.) | Organizational ID Number |
| 81.) | Other Address PO Box |
| 82.) | Priority |
| 83.) | Private |
| 84.) | Profession |
| 85.) | Referred By |
| 86.) | Sensitivity |
| 87.) | Spouse |
| 88.) | User 1 |
| 89.) | User 2 |
| 90.) | User 3 |
| 91.) | User 4 |
| 92.) | Web Page |
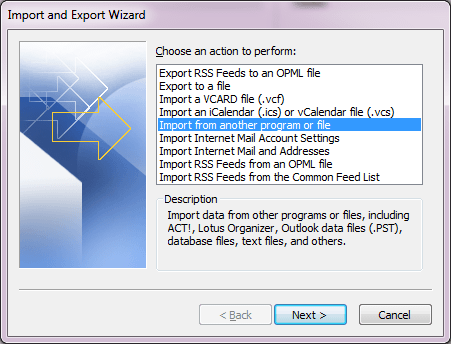
Now, if you have the correct or intact CSV file, you can import it to MS Outlook using these steps:
Step 1: Open MS Outlook 2010
Step 2: Click on File, then click Open
Step 3: Then click on Import

Step 4: In the dialog box that opens, select “Import from another program or file” then click Next.
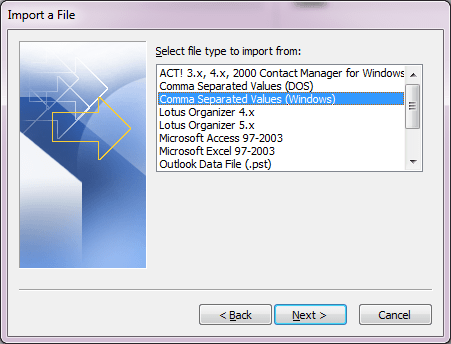
Step 5: In the next screen, select “Comma Separated Values (Windows)” then click Next
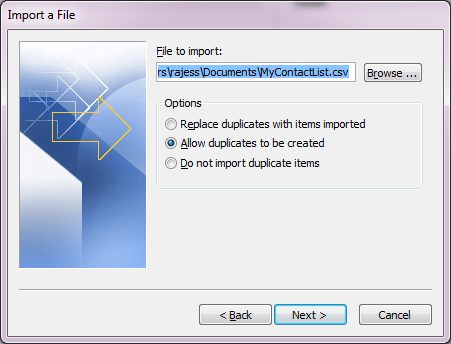
Step 6: In the dialog box that opens, please click on the Browse button and locate the CSV file where the address book is stored. It can be in your local hard disk drive or in a USB stick. When located and selected, the path of the CSV file shall then be listed in “File to import box”.
Step 7: The default import option is to allow duplicates to be created. This is a safe option since it will import email addresses or contacts allowing duplicate entries. You can then manually remove the duplicates inside MS Outlook. This is also useful so that you can merge contact information of two duplicate entries. You can keep this option. Then click Next.
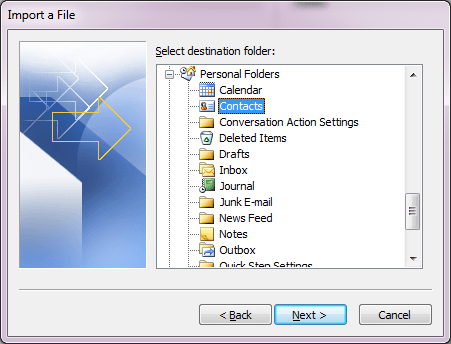
Step 8: In the next screen, this is critical, please scroll and locate your Contacts and select it. If you have multiple email accounts and multiple contacts folder, you can pick which contacts folder the CSV file will be imported to. Then click Next.
Step 9: In the next screen, click on Finish and allow Outlook to import the contacts in the CSV file to your selected contacts folder.
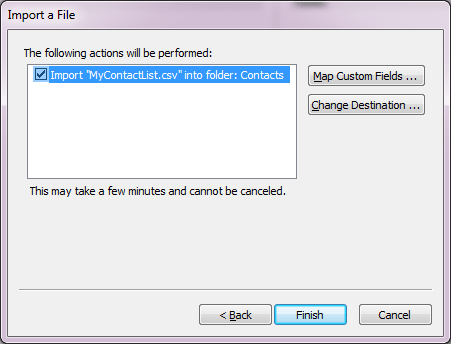
Step 10: The contacts shall now appear in your MS Outlook contact list