This annoying scenario happened to a lot of people already and you are reading this article precisely because you might have experienced this problem as well. The computer is able to connect to the wired or wireless network, but then the status shows “No internet access”. And true enough, accessing any website gives you “Page cannot be displayed” or similar browser error messages. This problem happens due to several factors, including but not limited to the following:
- A certain “protocol” could really be missing. For instance, TCP/IP v4 could have been corrupt or missing
- Network interface drivers could be corrupt
- DNS server configuration could be incorrect
- IP address assignment could be incorrect
In order to solve this problem, follow the 2 sets of procedures described below.
Re-install TCP/IP version 4
If an actual “protocol” is indeed missing as the error message indicates, then the best way to fix this is to reinstall TCP/IP version 4. Here are the steps:
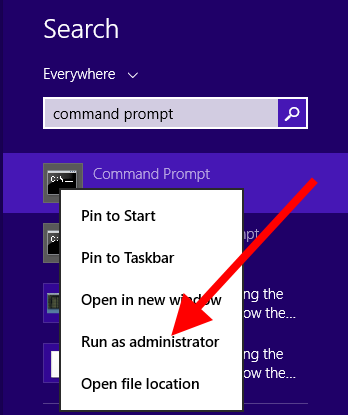
Step 1: Open an elevated command prompt. This is equivalent to opening Command Prompt as an Administrator. Depending on the version of Windows you are using, you can locate Command Prompt by just clicking on Start => All Programs => Accessories => System Tools => Command Prompt. You can also find Command Prompt by directly typing “Command Prompt” in the search box in your Windows 7, 8 or 10.
Step 2: When Command Prompt is found, right click on it, then click “Run as Administrator”

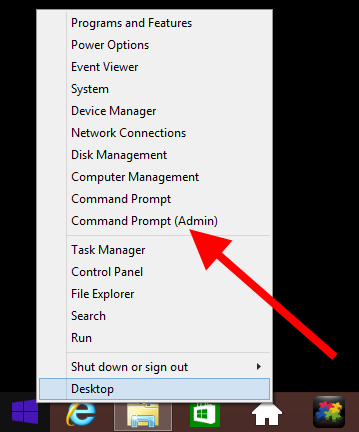
Step 3: For Windows 8 and Windows 10 computers, you can right click on the start button or the windows logo icon on the lower left corner of the screen, then click on “Command Prompt (Admin)”

Step 4: With the elevated command prompt open, execute the command below to install the missing protocol:
netsh int ipv4 install
Step 5: After the command is executed, restart the computer.
If the problem continues, proceed to the next procedures below.
Set a Dynamic IP Address
A problem occurs when you setup your network adapter to use a static IP when the router is set to DHCP which means the router dynamically assigns an IP. This results to an IP conflict or mismatch. If it is a conflict, then every time you restart the computer, when the IP is not in conflict, you can access the internet. If it is a mismatch, then you will never be able to access the internet until you follow the steps below to set a Dynamic IP Address.
- Locate the wifi or LAN connection icon in the system tray
- Right click on it, then click “Open Network and Sharing Center”. (You can also open Network and Sharing Center via Control Panel).
- Click on Change Adapter Settings in the left panel. You will get the Network Connections window.
- Locate the network adapter that you are using — the one that cannot connect to the internet.
- Right-click on the adapter and click Properties.
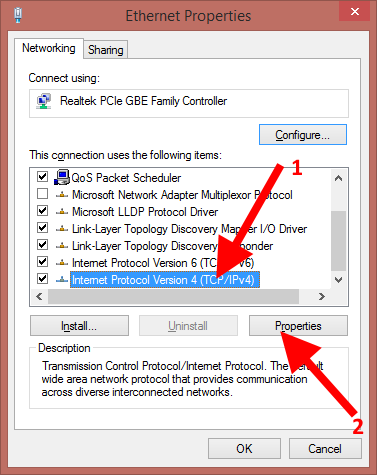
- In the list of items, locate and click on Internet Protocol Version 4 (TCP/IPv4).
- Click Properties

- Then select the option that says “Obtain an IP address automatically” and “Obtain DNS server address automatically”.
That is all! The error shall be corrected and you shall be able to access the internet just fine.
If the internet connection is intermittent, please read the article on “How to setup Google DNS in your Windows computer“.